11/30/10

Taco Night!


Homemade corn tortillas are the best. Just buy Masa Harina from the grocery store and follow the directions on the packaging.

11/25/10

Quinoa stir fry


Liquid ingredients are approximate

Ingredients:
1 cup raw quinoa, cooked according to package
1 crown fresh broccoli, chopped into bite sized pieces
1 carrot, julienned
1 cup cooked edamame without the pods
1 brick of extra firm tofu
2 scallions, chopped
2 cloves of garlic, minced
1/4 cup soy sauce
1 TBS corn starch
2 TBS cooking oil
1 TBS sesame oil
2 tsp chili garlic paste
2 tsp seasoned rice vinegar

Directions:
Drain the tofu and slice it in half like a hamburger bun. Place in a pie pan lined with paper towels. Place a paper towel on top and weigh a heavy pan on top to press out the liquid. Let rest for 10 minutes. Drain off excess liquid and chop tofu into bite size pieces. Heat the broccoli in the microwave with a small amount of water in a plastic wrap-covered bowl for 1.5 minutes.
Heat cooking oil in a large saute pan over high heat. When oil starts to shimmer, add the tofu and brown on all sides. Drain the oil. Add the carrot, scallion, garlic, broccoli, edamame and sesame oil. Toss to coat. Add the cooked quinoa, soy sauce, corn starch, chili garlic paste and vinegar and toss till thoroughly coated. Add more soy sauce if necessary to create a good glazed sauce.

11/24/10

Ascot No. 5

This was knit with Cascade Superwash yarn in a cranberry color that Stephen picked out. The small pearl button was his added touch.


11/21/10

Baby Owl Hat

This is for a friend's baby girl. It was knit on size 8's, 64 stitches.

11/20/10

Brown Rice with Pesto and Peas


Ingredients:
1.5 cups uncooked brown rice
2.5 cups boiling water
1 TBS butter
1 teaspoon salt
1 TBS olive oil
1.5 cups frozen peas
1/4 cup pesto
1/2 cup grated parmesan
1/4 onion, finely chopped
1 clove garlic, minced

Directions:
Make brown rice according to Alton Brown's Recipe. Ten minutes before rice is done, steam the peas in a small saucepan. Drain when they are just hot. Saute onions in olive oil over medium heat till soft. Add the garlic and lightly brown. Add the rice, cheese, peas and pesto and toss till rice is coated.

Ascot No. 3


I knit this with baby yarn from Michaels. I can't remember the brand, but it reminds me of Debbie Bliss, only much much cheaper. This was knit on 7's but since the yarn is meant for 8's it came out larger than my others. A girl in my knitting group gave me one of her grandmother's vintage buttons. I just love how it came out.

One thing I did differently from the original pattern is I bound off when I got to 4 stitches instead of 3. That way it's more rounded like the first point.

Frosty Winter Morning in Anchorage


11/18/10

Norwegian Purl

I've been trying to find a way to purl faster so I can churn out more braided headbands. After extensive YouTube research, I found a technique where you don't put the yarn in front of the work to purl. It's called the Norwegian Purl. It looks confusing, but for some reason it totally makes sense to me. It may take me a little longer to do this stitch, but I find it much more interesting and rewarding that I actually finished another headband!


Stephen is a master in disguise of picking good yarn. This is just Red Heart yarn from Wal Mart, but it knit up so well. He also decided to wear the headband backwards and I think it look much more masculine. I was skeptical that this design would look overly feminine, but he can pull it off. Must be all those years of wearing women's sunglasses...

11/15/10

I'm a mutant knitter

I'm a lefty. My grandmother taught me to knit when I was very young. Being married to a lefty, she must have empathized for my future self and taught me to knit left-handed. She had the best intentions, but how wrong she was to teach me this way.

I'm an adaptable person. I could have learned to knit the normal way, but for some reason, I knit in reverse. Take everything you know about knitting and make it backwards -- that's me. So when a pattern tells you to take three stitches from the left needle and transfer them to a cable needle, I have to automatically switch it to read, "take three stitches from the right needle..."

Usually this isn't a big problem. The only obstacle I've come across is when I made my Norwegian snowflake mittens and I had to follow an intricate chart. Figuring out where the thumbhole went and whether to ssk or k2tog proved tricky.

Recently, I made a headband using a seed stitch. This stitch takes me forever to make and I expressed this to a local shop owner/knitter who was admiring my work. She balked and said it's because I'm throwing my yarn, not picking it. I'm knitting English method, not Continental. If I were picking my yarn it would go by so much faster! This irked me a little. I couldn't shake it.

This was about two weeks ago, and since then I've received dozens of comments on this headband. So I decided to look into the two methods and figure out exactly what I'm doing. Turns out I'm some sort of hybrid knitter. I knit Continental method, but I wrap the yarn instead of pick.

What I need to learn is how to actually knit Continental. Then I can churn out these headbands. I have no idea why I learned to knit this way, but it would have been a hell of a lot easier if Grandma just taught me how to knit her way.

Lefties have their rights too!

11/14/10

Cabled Gauntlets

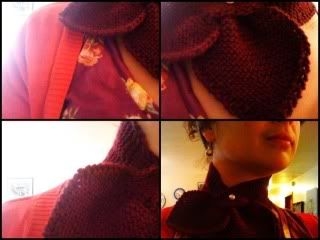
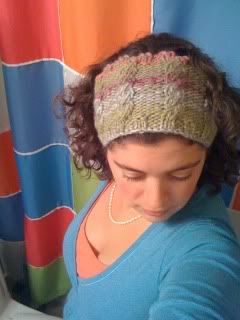
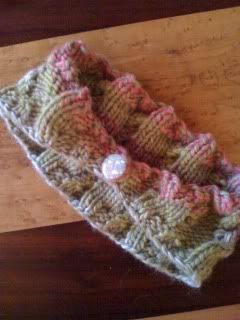
I really wanted to make fingerless gloves to match my headband, but I didn't want to deal with the individual fingers. I found a pattern for cabled gauntlets, but I didn't like the gusset design; so I merged my favorite mitten pattern with the cabled gauntlet pattern and came up with these:


Ingredients:
1 skein worsted weight yarn
Size 7 doublepoint needles
Darning needle
Waste Yarn

Cable round:
*K2, P2, slip 3 to cable needle and hold in back, K3, K3 from cable needles, P2, K1*

Cast on 36 stitches and divide them evenly on three needles (12 on each).
Knit 5 rows in seed st.
Rounds 1-6: *K1, P2, K6, P2, K1* repeat ** around (non-cable pattern)
Round 7: cable round

Repeat rounds 1-7 five times, or until glove is the right length for you

Repeat rounds 1-4 one more time

Part 2, the gusset:

Round 1: K1, P2, K3, make 1, K1, make 1, knit the rest of the round, continuing the cable pattern. Rearrange stitches so the M1, K1, M1 is at the end of a double point, not the middle.
Round 2 and all even rounds: K cable pattern
Round 3: M1, K3, M1, knit till end of round with cable pattern
Round 5: M1, K5, M1, knit till end of round with cable pattern
Continue in this method, making new stitches every other round, till you've reached
Round 11: M1, K11, M1 and knit till end of round with cable pattern. You may need to add another doublepoint.
*The non-gusset stitches pattern would look like this:
K 2 rounds in non-cable pattern
K round 7
K rnds. 1-7*
When the gusset is the right number of stitches, Knit 4 rows of non-cable pattern. The gusset should be knit in stockinette stitch.
Put the 13 gusset stitches on waste yarn
Cast on 1 stitch and K5 rows in non-cable pattern
Seed stitch 6 rows and cast off.

Thumb:
Transfer gusset stitches to three doublepoints. Pick up 2 stitches where the crotch of the thumb will be. You can pick up more than two if it will make fewer holes, just be sure to knit them together on the first round.
Knit 2 rounds
Seed stitch 2 rounds
Cast off

Weave in ends

My Classic Ear Flap Hat

This pattern is my tried and true hat design. A spin-off of Far North Yarn Co.'s Alaska Ear Flap Hat, I have made probably about 50 hats over the past 7 years. Here is my pattern along with several photos of different hats I've made. I make the size small for an average head. That's 72 stitches total.

Sizes XS, S, M, L

Ingredients:
Size 9 or 10 circular and doublepoint needles
1 skein bulky yarn. I love Lamb's Pride.
Tapestry Needle
Pom pom maker (optional)

Ear flap (make 2):
With two double point needles cast on 2 stitches. Purl 1 row. Work back and forth in stockinette stitch. Every time you do the knit side (right side), increase in the front and back of the first and last stitch. This will create the triangle shape. Keep going until there are 16 stitches for the XS, 18-S, 20-M, or 22-L. Place these stitches on a holder. 

Hat: With the circular needle, cast on 12-XS, 14-S, 16-M, or 18-L stitches for the back of hat; knit across stitches of the first ear flap making sure the right side is facing you. Cast on 20-22-24-or 26 stitches for the front; knit across second ear flap. There will be 64-72-80-or 88 stitches in all. Join stitches carefully without twisting. Knit 2 purl 2 on the front and back part of the hat (regular knit the ear flaps) for four to six rounds. This will make the nice ribbing and will prevent the hat from curling up.

Continue knitting until the hat is about 5.5 inches tall. I usually go with 32 rows from the edge of the hat. 
Then start decreasing as follows:
Round 1: Knit two together, knit 6. Repeat for one round.
Round 2 (and all even rounds): Knit
Round 3: K 2 together, K 5 for one round
Round 5: K 2 together, K 4 for one round (this is where you should probably switch to the double points).
Round 7: K 2 together, K 3 
Round 9: K 2 together, K 2
Round 11: K 2 together, K 1
Round 13: K 2 together
Gather remaining stitches with a darning needle and fasten off. Weave in all tails.

I just braided yarn together to make the ties for the flaps. You could also do a cord stitch where you have three stitches on a doublepoint. Knit to end of row and instead of turning the work, just push them back up to the end so the yarn wraps around the back. Knit in this way till it's long enough. Braiding is faster and pretty.

Sometimes I add a pom pom. This is especially nice when making a stripey hat because you can include all the colors in the pom pom and it's faster to make than one color.


Here's a montage of some of the hats I managed to take photos of before giving them away.


Felt Owl Ornaments

My friend Rosey is a lover of all things owl and it has definitely rubbed off on me. We made a bunch of felt owls for a Christmas bazaar last month. Although I don't have photos of hers, which were undeniably cute, here are some of mine I didn't sell. Notice there is one cat ornament.


And one unstuffed owl:

Homemade Christmas Cards -- 2009

I thought this project would be applicable for this time of year.

My boss gave me a big book of wrapping paper samples and it has come in handy on several occasions. I made several mini Christmas cards and regular ones as well. They were so much fun to make. 


Cabled Tapered Headband

This pattern is based on the Calorimetry Headband at Knitty.com

We sell tapered cabled headbands at work and I figured I could probably make one. Here is the pattern!


Needles: size 10 circular
Yarn: Lamb's pride bulky (I used two worsted weights together to create the color combo)

Cable pattern will be made on the wrong side of your work. 
Cable pattern: 
Row 1: K4 
Row 2: P4 
Row 3: C4F (transfer two stitches to cable needle and set in front of work. Knit the next two stitches then Knit the two stitches from the cable needle) 
Row 4: P4 
note: I don’t make the cable pattern on the outermost corners of the headband because there are so few rows.
CO 72 St. 
Row 1: K2, P2 
Row 2: K2, P2 to last two stitches. Turn work. 
Row 3: Slip 1 purlwise, P1, K2, place marker. P2, K2 to last two stitches. Turn work. 
Row 4: Remove marker. Slip 1 purlwise, P3, place marker. Start cable pattern: K4, P4 to marker. Turn work. 
Row 5: Remove marker. Slip 1, P3. Place marker. K4, P4 to marker. Turn work. 
Row 6: Remove marker. Slip 1, K3. Place marker. P4, C4F to marker. Turn work. 
Row 7: Remove marker. Slip 1, K3. Place marker. P4, K4 to next marker. Turn work.
Continue rows 4-7 till there are five groups of four stitches on the outside of the stitch markers (22 stitches). *If you want a narrower headband, knit until there are 18 stitches on the outside of each stitch marker.*
Row 8: When both sides have 22 stitches, start the next row without removing the stitch marker and knit in the cable pattern to the next marker. Turn work. 
Row 9: Without removing the stitch marker, continue in the cable pattern to the next marker. Remove marker and knit the next four stitches according to the cable pattern. Turn work. Place marker.
Row 10: Place marker and knit in cable pattern to next marker. Remove marker and knit 4 stitches according to cable pattern. Turn work. Place marker.
Continue Row 10 till there are only two stitches on the outside of both markers. 
Row 11: P2, K2 removing all markers 
Row 12: K2, P2 removing all markers
Row 13: BO in ribbing pattern (K2, P2) 
Weave in ends. Sew on a button to one corner. There should be a hole you can put the button through easily.

LinkWithin

Related Posts Plugin for WordPress, Blogger...