

First, download the pants pattern from Make-baby-stuff.com. I made the 0-3 mos. pattern.
Materials:
One large T-shirt with no seams on the sides
One extra shirt of contrasting color (for reverse applique)
About a foot of 1/2-inch wide elastic
Sewing machine
Stretchy material needle (this will make everything MUCH easier)
Straight pins
One safety pin
Chalk or washable fabric marking pen
Fabric scissors
Directions:
Lay out your T-shirt flat and trace your pattern on either side.


Make sure the pattern's leg holes are flush with the bottom of the shirt. This will make it so you don't have to hem the pants. Be sure the bottom hem lines up on both sides before cutting.
Next, cut a shape from a piece of paper. I made a heart about three inches tall. Cut a piece of fabric from the contrasting shirt that's an inch bigger than the shape on all sides.

Next, trace the shape onto the pant leg using chalk or washable fabric pen. I put mine on the front panel (there is no front and back to each leg, so it doesn't matter which side.) Pin the contrasting piece behind where you want the shape to be, on the wrong side of the fabric.

Sew along the trace marks and backstitch just slightly so it doesn't unravel. Carefully pull the two fabrics apart and cut away the main color so the contrasting color shows. Trim to your liking.

As you can see, I could have placed the heart farther down, but oh well. It was my first try!
Now you're going to sew the inseams of each leg. That's the straight edge you cut from the pattern. We'll worry about the curved edge in the next step. Make sure you sew the legs with the right sides together.
Here's the fun trick of this pattern -- Take one leg and turn it right side out. Slip this leg inside the other leg (which is still inside out) and pin the curved edges together.


Pin the curved edge so that the seams you just made match up in the middle on both sides. This is the front and back crotch seams. You're going to just sew along the curved edge. You may want to sew another stitch to reinforce this seam. After you sew the crotch, take the inside leg out. Your pants should now be inside out. If one leg is right side out and the other is inside out, you didn't make sure the right sides of the legs were together when you sewed the crotch.
Next step (no photo since it's easy), turn down the waistband about an inch and sew all the way around the waist, leaving a 1-inch hole in the back (the opposite side from the heart shape) so you can thread the elastic.
Attach a safety pin to the end of the elastic and feed it through the channel you just made.
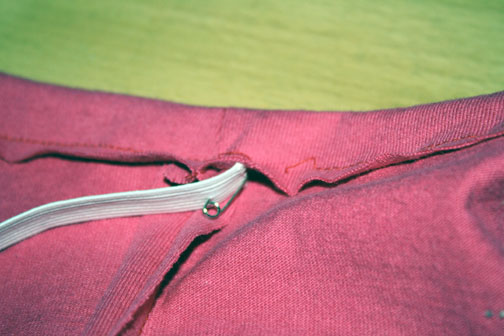
Make the elastic as tight as you see fit (I honestly don't know baby waist sizes. I just judged it by how it looked). And zig-zag stitch the elastic together, trimming the excess elastic.
Sew up the 1-inch hole, making sure to back stitch. Turn your pants right side out and TA-DA!

Pants!
No comments:
Post a Comment