12/22/13

Retro Baby Ski Hat -- Free Pattern

I'm getting down to the knitty gritty here for Christmas presents. I just had one more hat on my list and that was for my best friend's new baby.
I knit this up in just a couple of hours -- and you can too with this simple pattern.
Retro baby ski hat -- Free Pattern | Alaska Knit Nat
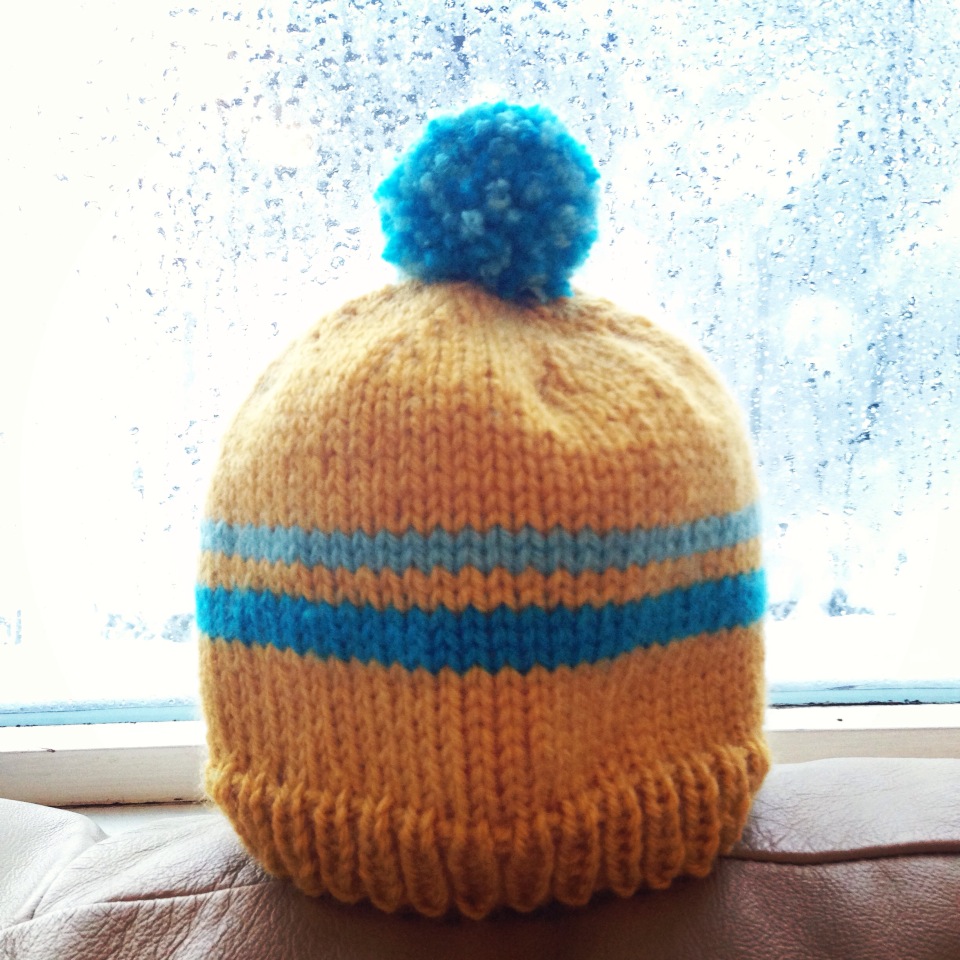
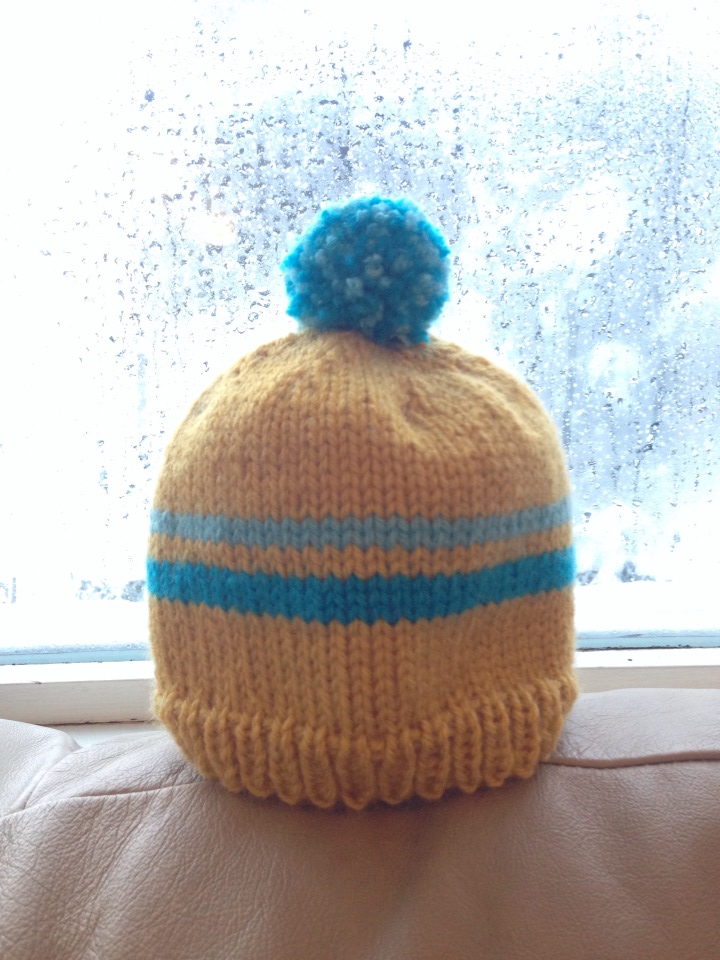
Retro Baby Ski Hat -- for a 3-6 mo. baby
Materials:
Vanna's Choice worsted weight yarn -- mustard, teal and light blue
Size 9 circular needles
size 9 double pointed needles
darning needle
large fork or pom pom maker
Abbreviations:
k1, p1 = knit 1, purl 1 ribbing
k2tog = knit two stitches together
Directions:
With your circular, cast on 64 stitches with mustard color and knit last stitch to first stitch without twisting the stitches. K1, P1 for six rounds. Knit 8 rounds in stockinette stitch.
Switch to teal and knit three rounds. Do not cut mustard yarn.
Cut teal yarn with an 8-inch tail. Switch to mustard yarn and knit two rounds.
Switch to light blue and knit two rounds. Do not cut mustard yarn.
Cut light blue yarn with an 8-inch tail and knit 10 rounds with mustard.
Begin decrease as follows:
Place a marker if you need to, but I can tell where the beginning of the round is based on the stripes.
K2tog, K6, repeat till end of round
Knit one round
K2tog, K5, repeat till end of round
K one round
K2tog, K4, repeat till end
K one round while transferring to double pointed needles. Or knit the round and transfer stitches — whatever’s easier for you.
K2tog, K3, repeat till end
Knit one round
K2tog, K2, repeat till end
Knit one round
K2tog, K1, repeat till end
K2tog, repeat till end.
Cut yarn leaving a long tail. With darning needle, draw up remaining stitches and weave in all ends.
For the pom pom:
Take both the teal and light blue yarn and wrap them around a large serving fork till it's pom pom sized. With a doubled piece of yarn about one foot long, tie the yarn around the middle tine and remove from the fork. Cut the loops and trim pom pom to your liking. Using a darning needle, attach to top of hat. To better secure pom pom, run the yarn back up through the pom pom and back down into the inside of the hat.
Retro baby ski hat -- Free Pattern | Alaska Knit Nat

Simple Fox Hat -- Free Pattern

In case you haven't noticed, foxes are really in right now. This season I've already crocheted a nifty fox basket and sewn several felt fox ornaments. I really wanted to make a fox hat for a friend's baby, but I'm pretty terrible at fair isle and halfway through my first attempt, I scratched the whole thing. The snout was all scrunched and I didn't like the look of it.
I decided on something much simpler -- my regular old hat pattern with some ears sewn on top. I winged the ears, but I really like how they turned out. For this project I used some Montera Classic Elite llama/wool chunky yarn I'd been coveting for some time. This hat is fuzzy, warm and downright delightful.
Simple Fox Hat -- Free Pattern | Alaska Knit Nat
Here's what you need:
1 skein of orange chunky yarn (I used Bolsita Orange from Montera Classic Elite)
size 9, 16-inch circular needle
one set of size 9 double pointed needles
darning needle
Size: This pattern fits a 12-18-month baby. For a larger hat (2T-3T), cast on 72 stitches and follow the same pattern. For a smaller hat, knit this same pattern on size 8 needles.
Gauge: I do not gauge my work, but according to Montera yarn's website, it should be 3.5-4 sts/inch on size 9 needles.
Abbreviations:
k2tog= knit two stitches together
For the main body of the hat, cast on 64 stitches on the circular needle and knit last stitch to first stitch without twisting the stitches. Knit 1, purl 1 ribbing for five rounds. Knit in stockinette stitch for 22 more rounds, or until piece measures about 5.5 inches.
Decrease as follows:
Place a marker at beginning of round.
K2tog, K6, repeat till end of round
Knit one round
K2tog, K5, repeat till end of round
K one round
K2tog, K4, repeat till end
K one round while transferring to double pointed needles. Or knit the round and transfer stitches — whatever’s easier for you.
K2tog, K3, repeat till end
Knit one round
K2tog, K2, repeat till end
Knit one round
K2tog, K1, repeat till end
K2tog, repeat till end.
Cut yarn leaving a long tail. Run the yarn through the remaining stitches with a darning needle and draw up the hole tight. Weave in ends.
Ear (make 2):
Simple Fox Hat -- Free Pattern | Alaska Knit Nat
With three double pointed needles, cast on 16 stitches (5, 5, 6), leaving a 12-inch tail. Connect last stitch to first stitch and begin knitting in the round. Knit 3 rounds.
K2tog, k3, K2tog, k3, K2tog, k4
Knit 2 rounds
K2tog, k2, k2tog, k2, k2tog k3
Knit 1 round
K2tog, k1, k2tog, k1, k2tog, k2
Cut yarn leaving a 6-inch tail. Run yarn through the remaining stitches and draw up tight. Weave in the end on the inside of the ear.
With your darning needle and the long cast-on tail, sew the bottom of the ear closed.
Simple Fox Hat -- Free Pattern | Alaska Knit Nat
As for sewing on the ears, I folded my hat in half and determined the best placement of the ears. I sewed each ear on with the remaining length of cast-on yarn. I didn't use any special technique for sewing, so I recommend whatever you feel most comfortable with. I actually didn't have enough cast-on yarn so I did some touch ups with extra yarn.
Simple Fox Hat -- Free Pattern | Alaska Knit Nat
Now it's up to you whether to stitch a little nose and eyes on the front of the hat. I decided not to as I figured the child's face would be the fox's face. Either way would be cute!
Simple Fox Hat -- Free Pattern | Alaska Knit Nat

11/28/13

The Easy Way to Line a Hat

I could knit hats all day, but ask me to line a hat and chances are I'll never do it. Something about measuring a head, cutting out fabric and sewing it into a hat seems like way too much work.

I was recently deconstructing a cashmere turtleneck for another project and was trying to figure out how to use the turtleneck tube. Headband? Too ugly. Hat lining? Perfect.


Here's how to line a hat with minimal effort. Just some scissors, pinning and whip stitches.

What you'll need:
An old turtleneck
Fabric scissors
A person's head (not yours)
Straight or safety pins
Needle and thread

Directions:
Cut the tube of the neck away from the body of the sweater. I cut below the seam so it wouldn't unravel over time.

Turn the tube inside out and put it on a head with the seam in the back.


Put the hat over the tube and line it up the way you'd like it (if there's a seam to the hat, it should also be in back). Let the hat overhang the tube by 1/4 inch.

Pin the tube to the hat all the way around. This way it will remain stretched out as you sew it and won't cause the hat to pucker.

Remove the tube and hat from the head and thank your head for its assistance.

With thread matching the color of the hat, whip stitch the lining to the inside of the hat, trying to sew into the inside knitted stitches so as not to reveal the thread on the outside of the hat. The following photos are from a different hat and turtleneck.


Inside-out view


That's it! Now your hat is warmer and cozier.

11/27/13

Baby Candy Cane Stocking Cap -- Free Pattern

My photographer friend commissioned me to make a cute stocking cap for her holiday baby photo shoots.

I've never made anything so tall and pointy, but I think the effect is perfect. Could a baby look more like an adorable naked Christmas elf?

Photo by Laura Stennett Photography

This pattern is for a 3-6 month head. It's also a great introduction to knitting stripes.

Ho ho hope you enjoy it!

Baby Candy Cane Stocking Cap

Materials:
One skein of red worsted weight yarn
One skein of cream worsted weight yarn (I used Red Heart soft)
Size 9 circular needles
Set of 9 double-point needles
darning needle
pom pom maker or large fork

Abbreviation: K2tog = knit two stitches together

Directions:
With the red yarn cast on 64 stitches on your circular needle. Join with first stitch being careful not to twist the stitches. Begin ribbing in k1, p1 for six rounds.

Switch to white yarn and knit 2 rounds. There is no need to cut the red yarn as the rows are so narrow you can easily bring up the other yarn when you need it.

Continue knitting in stockinette stitch for 25 more rounds changing colors every 2 rounds. Transfer stitches to double pointed needles and begin decreasing as follows (while continuing to switch colors every 2 rounds):

*K2tog, k6, repeat * till end of round
knit 3 rounds
*K2tog, k5, repeat * till end of round
knit 4 rounds
*K2tog, k4, repeat * till end of round
knit 6 rounds
*K2tog, k3, repeat * till end of round
knit 15 rounds
*K2tog, k2, repeat * till end of round
knit 16 rounds
*K2tog, k1, repeat * till end of round
knit 5 rounds
*K2tog, repeat * till end of round
k 4 rounds. Cut yarn leaving a 12-inch tail. Using a darning needle, draw up remaining stitches and weave in all ends.

Make your pom pom and sew it to the top.


Happy Holidays from Alaska Knit Nat!

11/26/13

Chicken in a Sherry Mushroom Sauce with Baconated Collard Greens

Being a working mom can often leave me beat at the end of the day. I always try and throw something together, but once in a while it's nice to make something fancy.


The dish I made tonight was again inspired by an NPR show. Today on Fresh Air the chefs from America's Test Kitchen were talking turkey and mentioned a collard greens side dish that sounded pretty tasty. I wasn't able to find the recipe on Fresh Air's website, so I winged it.

I'm not too familiar with cooking collards, but what I came up with was bright, slightly smoky and delicious.

The chicken, coincidentally enough, was inspired by an America's Test Kitchen recipe for chicken piccata. This was healthy meal and was enjoyed by all (even our son liked the collards!)

Serves 3, prep/cooking time: 45 mins.

Ingredients for the chicken:
2 boneless, skinless chicken breasts
Olive oil
2 tsp. soy sauce
3 Tbs. apple cider vinegar
5 cloves garlic, chopped
1 tsp. Dijon mustard
salt and pepper
flour
butter
1/2 medium onion, finely chopped
2 cups chopped fresh mushrooms (such as button, crimini and baby portobello)
1/4 cup sherry or white wine
3/4 cup chicken stock
2 Tbs. fresh parsley, chopped
1 tbs. capers (optional)
squeeze of lemon

Ingredients for the collards:
1 bunch collard greens
3 slices bacon, chopped
1/2 medium onion, finely chopped
1 cup chicken stock
2 tsp. apple cider vinegar
salt and pepper

Directions:

With a fork, stab the chicken all over. Place in a large Ziploc bag with 3 Tbs. olive oil, the soy sauce, vinegar, mustard, 3 cloves of garlic, salt and pepper. Marinate chicken in the fridge for 30 minutes.

Meanwhile, rinse the collards and remove the stalks. Roughly chop the collards. In a dutch oven, brown the bacon and set aside. Add 1 Tbs. olive oil and sauté the onions till soft, about 5 minutes. Add the collards and stir till they are wilted, about 3 minutes. Add the chicken stock, cover and let steam for 30 minutes, adding more stock if needed. There should be very little liquid in the pot toward the end, so partially cover and let liquid evaporate if needs be.

While the collards cook, pat dry the chicken and dredge in flour.

Preheat the oven to 400 degrees. Heat a large oven-safe skillet over medium-high heat. Add 1 Tbs. butter and 1 Tbs. olive oil. When pan is hot, add the chicken and brown on both sides, about 5 minutes per side. Set chicken aside.

Add the mushrooms and onions and sauté till onions are soft. Add 2 cloves of garlic and cook for one minute. Stir in 2 Tbs. flour and cook for another minute. Pour in the sherry and stock and bring to a simmer, scraping up all the yummy burnt bits from the bottom of the pan.

When the sauce has thickened, place the chicken back in the pan. Cover the pan and place it in the oven. Bake for 20 minutes or until chicken is cooked through.

Set the chicken on your serving plates and add parsley and capers to the sauce in the pan. Stir and spoon over the chicken. Add a fresh squeeze of lemon juice to each plate.

To finish the collards, stir in the bacon bits and vinegar. Add salt and vinegar to taste.

Serve with brown rice or farro.


11/19/13

Pink Elephant Scarf

A few years back I got hooked on a pattern from Pickles.no called the Simple Luxury Scarf. It was indeed simple and I must have made five or six of them.

The pattern calls for two different high-quality yarns to be knitted at once. Each scarf was setting me back about $28.

Now that I'm not able to splurge on every yarn desire I decided to try the pattern with an inexpensive yarn. It turned out great and totally gift worthy. Patons Divine Yarn contains a little wool and mohair so you still achieve the fluffy, luxurious look and feel. I call it scrumptious. And at $4 after a JoAnn's coupon, I call it a great deal.


I didn't refer to Pickles' pattern this time around and it turns out I made it slightly differently, which is why I'm providing my pattern below; but I want to be clear that it originated from Pickles' pattern.

This pattern is for any level of knitter. It's a great way to pass winter weekend where it's -3 degrees outside.

Materials:
1, 100-gram ball of Patons Divine Yarn (I used the Chantilly Rose color)
a long size 15 circular needle
darning needle


Abbreviations:
M1FB = Make 1 stitch in the front and 1 in the back of the same stitch, thus increasing your work by one stitch.
M1 = make 1 stitch

Special note: You'll be using a circular needle only to easily hold a large number of stitches required for this scarf. You will not be joining the work in the round.


Directions:
Cast on 4 stitches.
M1FB into the first stitch. Knit to end of row.
Repeat previous row until you have used most of the yarn.

Final row: M1FB, K1, M1 *K3, M1. Repeat * to end of row. It's ok if you have a few extra stitches at the end. Just knit those. Cast off final row. Using darning needle, weave in ends.


11/14/13

Ice Cream Sundae Hat -- Free Pattern

During my bedtime Pinterest bingeing (I like to call it "pingeing") I came across a lovely knitted hat from http://muitaihania.blogspot.dk/.

I don't know Finnish, but I'm pretty sure the blogger didn't post a pattern for it. *Correction: After 30 seconds of browsing the site, I did find the pattern. Oh well!

So here's my version. It's called the Ice Cream Sundae Hat and it's lovely. I made it up as I went along and the pattern is simple enough that I don't think I need to provide a chart as long as you follow the instructions.


Materials:
3 colors of bulky yarn such as Lamb's Pride Bulky, (Color A, Color B, and Color C)
Size 9 circular needles
Size 9 double-pointed needles
darning needle
pom-pom maker or giant fork

Abbreviations:
K = knit
P = purl
k2tog = Knit two stitches together


Special notes: You'll be knitting a basic fair isle pattern, so carry the unworked yarn across the back of the stitches you're working, being VERY CAREFUL not to pull the unworked yarn too tightly. Your hat will shrink significantly in diameter if you don't pay attention to the unworked yarn. I intentionally made my pattern bigger than my normal hats to account for my habit of pulling too tightly.

On your circular needle, cast on 80 stitches with Color A. Place marker on needle. Knit into the first stitch, being careful the stitches aren't twisted. K2, P2 for five rounds. Knit 3 rounds regularly. 

Round 9: With Color A, Knit 3 stitches. *With Color B, knit 4 stitches. With Color A, knit 6 stitches.* Repeat ** till end of round (you'll end by knitting 3 stitches with color A).
Round 10: With Color A, Knit 2 stitches. *With Color B, knit 6 stitches. With Color A, knit 4 stitches.* Repeat ** till end of round, ending with 2 stitches of Color A.
Round 11: With Color A, Knit 1 stitch. *With Color B, knit 8 stitches. With Color A, knit 2 stitches.* Repeat ** till end of round, ending with 1 stitch of Color A.
Rounds 12 & 13: With Color A, knit 1 stitch. *With Color B, knit 9 stitches. With Color A, knit 1 stitch.* Repeat ** till end of round. Cut Color A leaving a six-inch tail.
Knit 5 rounds with Color B.
Repeat rounds 9-13 with Colors B & C.
Knit 6 rounds with Color C.

Decrease as follows:
Round 1: Knit two together, knit 6. Repeat for one round.
Round 2 (and all even rounds): Knit
Round 3: K2tog, K 5 for one round
Round 5: K2tog, K 4 for one round (this is where you should probably switch to the double points).
Round 7: K2tog, K 3
Round 9: K2tog, K 2
Round 11: K2tog, K 1
Round 12: K2tog
Cut yarn leaving a 12-inch tail. Gather remaining stitches with a darning needle and fasten off. Weave in all tails.

For the pom pom:
I recommend a pom pom maker, which you can buy for about $6 at any big-box crafts store. Another super technique I found on Pinterest, where you use a serving fork. It's pretty great if you're feeling lazy.

Secure your pom pom to the hat using yarn and a darning needle. Run the yarn through the pom pom a couple of times and tie on the inside of the hat. I always try and leave a little length in case the pom pom loosens so I can easily refasten it.


Thanks again to Muita Ihania for the pretty design. 

Please contact me if there are any errors in the pattern. I've already given the hat away so I wasn't able to look at it as I was writing the pattern.

11/9/13

Quick Craft: DIY Heart Shirt

Shirts with big hearts are big right now, but despite the fad I actually think they are pretty cool.

I've had a few old cashmere sweaters awaiting crafting and this was the perfect short-attention-span craft: cut out a heart, sew it on a shirt.


My husband had the idea of sewing on the heart with contrasting embroidery thread. It not only gives it some "pop," but it also adds more of a homemade touch.

Here's what you'll need:

An old sweater
A plain shirt
A large piece of paper or newspaper
chalk
Thin, double-sided fusible interfacing or Stitch Witchery
Embroidery thread
iron
large needle


1. Make a heart template to your liking. I just folded an 11 x 17 piece of paper in half and cut out a heart shape.


2. Place your heart template on the sweater and use chalk to trace the shape. Cut your shape out of the sweater.

3. Figure out where you'd like the heart to be placed on your shirt. Cut strips of interfacing or Stitch Witchery and place them on the shirt. Lay your heart, right side up, on top of the strips and fiddle around to get everything centered and flat. The photo below just shows where I placed the Stitch Witchery. In reality, the strips should not be facing up.


4. Iron the heart according to interfacing instructions, so it fuses to the shirt. This way it won't slip around when you're sewing and you won't have to worry about pins sticking you as you sew.

5. Cut a long piece of embroidery thread and straight stitch around the edge of the heart. Secure thread with a couple of knots on the inside when finished.


Ta-da!


11/6/13

Mushroom Risotto with Parsnip Purée

Yesterday on my way to work I was listening to a story on NPR's Morning Edition about Mediterranean cooking and a chef was talking about a mushroom risotto with parsnip purée. They didn't provide a recipe, so I patched my own together from several different recipes I found online.


As usual, the photo falls flat (it's dark when I eat dinner!) but trust me, if you like mushrooms, this is a great meal and can easily be made vegetarian if you sub veggie stock for chicken stock.

I technically didn't use Arborio rice for last night's meal. I used farro, which is an ancient grain that's supposedly really healthy and can be found at health food stores. Use whatever grain you desire, you'll still have a flavorful dish.

I've not really cooked parsnips before, and purée sounds fancy, but is really just cooked parsnips put in the blender. Simple, creamy, flavorful and a great topping to the risotto.

I served this with chicken piccata -- cutlets in a white wine lemon sauce with capers.

Ingredients for risotto:
1/2 onion, finely chopped
olive oil
3/4 lb. crimini or button mushrooms, sliced
1 oz. dried porcini mushrooms (optional)
3/4 cup dried Arborio rice, farro or brown rice
1/4 cup dry white wine or sherry
2-3 cans chicken or vegetable stock
1/4 cup water
2 Tbs. butter
1/2 cup grated parmesan cheese
salt and pepper to taste

For the parsnips:
1/2 lb. parsnips, peeled and largely diced
1 cup milk
1/2 cup chopped onion
1 Tbs. butter
salt and pepper to taste

Directions:
In a small microwave safe bowl, place the porcini mushrooms with 1/4 cup stock and 1/4 cup water. Cover bowl with plastic wrap and heat for two minutes. Let sit for 5 minutes. Reserve the liquid and finely chop the porcini mushrooms.

Heat a couple of tablespoons of olive oil in a large saucepan or skillet. Sauté the crimini and porcini mushrooms for about five minutes, stirring occasionally. Set mushrooms and any liquid aside. Add another small swig of olive oil and sauté the onions until translucent, about five minutes. Add the dry rice and cook for a couple of minutes. Add the white wine and simmer until liquid is absorbed. Add half the mushroom water and cook till absorbed, stirring occasionally. Add the remaining mushroom water. Continue adding stock 1/2 cup at a time letting rice absorb the liquid before adding more, stirring occasionally for about 20-30 minutes when rice becomes tender.

Meanwhile, add the milk and parsnips to a small saucepan and simmer till parsnips are tender, about 20 minutes. Be sure to keep an eye on the milk as it can easily boil over if heat is too high. While parsnips are cooking, heat the butter in a small frying pan. Add the 1/2 cup onion and sauté till soft, about five minutes.

Add milk, parsnips and onions to a blender and blend till completely puréed. Transfer to a small serving bowl, season with salt and pepper, cover and set aside.

When the rice is tender and ready to eat, turn off the heat. Stir in the mushrooms, butter and cheese till well combined. Serve risotto with dollops of parsnip purée.


11/2/13

Creamy Tomato Soup with Tortellini and Sausage


Ingredients:
2 Tbs. olive oil
1 onion, chopped
3 cloves garlic, minced
5 button mushrooms, sliced (optional)
2 tbs. flour
1 bay leaf
2 cups chopped cherry tomatoes
2 Tbs. tomato paste
1.5 cans chicken stock
2 cans condensed tomato soup
1 tsp. dried porcini powder (optional)
2 Tbs. dried basil
2 tsp. dried oregano
salt and pepper to taste
1/2 package frozen tortellini
1 lb. Italian sausage
3/4 cup whole milk or half and half
grated parmesan cheese

Directions:

Heat oil in a large dutch oven over medium high flame. Add the onion, mushrooms and garlic and cook till onions are translucent, about 7 minutes. Stir in the flour and cook another couple of minutes. Add the bay leaf, tomatoes, tomato paste, chicken stock, tomato soup and seasonings and bring to a simmer. Turn heat to low and simmer for 30 minutes to an hour.

Meanwhile, cook your sausages and brown them all over. Slice into rounds and brown those too. Add the sausage and tortellini to the soup. When tortellini is cooked, stir in the milk. Remove bay leaf. Serve with grated parmesan cheese and slices of buttered rustic bread.


10/15/13

Easy Homemade Chicken Stock

Making your own chicken stock is actually pretty easy and far more delicious than store bought stock.

I like to make the most of a Costco rotisserie chicken. I can stretch it for three meals.

1. Chicken with stuffing and glazed carrots

2. Chicken pesto lasagna roll-ups

3. Chicken noodle soup

The secret to tasty chicken stock is in the bones. By crushing the chicken bones you release all the marrow and yummy goodness into the stock. You know you have a good stock when it's like Jell-o in the fridge -- that means the bones really got into the stock. I do cheat a little bit by adding a can of store bought stock just to boost the flavor, but it's not necessary.


Ingredients:
1 leftover rotisserie chicken
2 Tbs. olive oil
1 onion, chopped
2 celery ribs, chopped
2 carrots, chopped
handful of fresh parsley
2 fresh rosemary sprigs
1 tsp. dried thyme
1 bay leaf
6 cups water
1 can chicken stock (optional)
salt and pepper

Directions:
Remove all the edible meat left on the chicken and store in the fridge (in case you'd like to use it for chicken noodle soup later).
Using a mallet or the bottom of a wine bottle, crush that carcass so that all the bones are broken up.
Heat the oil over medium high in a large soup pot. Add the onion, celery and carrots and cook for about five minutes. Add the chicken, parsley, rosemary, thyme and bay leaf and cook till onions are translucent, about 10 minutes. Add pepper to taste. Add the liquid, cover and simmer for about three hours. Salt to taste.


Set a fine-mesh strainer over a large liquid measuring cup and carefully strain the stock to remove bones, veggies and other flavor enhancers. You may need to do this in batches. Toss the solid ingredients. Store stock in jars. You can freeze the jars but make sure not to fill them all the way to the top to allow stock to expand when freezing (science!)


If you're making chicken noodle soup, add the chicken meat back to the stock. Add egg noodles to boiling soup and cook till al dente. Yum!


10/13/13

Cranberry Cornbread Stuffing

My sister just cleared out her garden and gave me a gallon bag of fresh sage. In my pursuit to use some of it before drying it I found a great recipe on Foodnetwork.com for Stuffed Pork Chops.

I decided I didn't feel much like pork chops for dinner, but that cornbread stuffing sounded pretty good. Plus, I have three gallons of cranberries I need to figure out how to use.

I picked up a Costco rotisserie chicken, made some glazed carrots and I had a mini-Thanksgiving in no time at all.


I reheated the chicken in the oven 20 minutes before taking out the stuffing (or dressing in this case) and it made enough juice for some tasty gravy.

Ingredients:
2.5 cups crumbled cornbread
2 slices of bacon, chopped
1 Tbs. butter
2 celery ribs, chopped fine
1/2 onion, chopped fine
2 garlic cloves, minced
6 baby portobello mushrooms, sliced
1 Tbs. chopped parsley
1 Tbs. chopped sage
1 Tbs. chopped rosemary
1/4 cup dried or fresh cranberries
1/4 cup golden raisins
1/2 cup chicken stock
Salt and pepper to taste

Directions:
Preheat oven to 350 degrees.

In a heavy skillet, start browning the bacon. Add the celery, onion, garlic and mushrooms and cook till bacon is fully cooked, about 10 minutes. Add the parsley, sage, rosemary (sorry, no thyme) and cook another couple of minutes. Salt and pepper to taste.

In a bowl, toss together the cornbread, cranberries and raisins. Add the rest of the ingredients including the chicken stock and gently toss to combine.

Transfer to a casserole dish and top with little bits of butter.

Cover and bake for 50 minutes.

10/5/13

Pumpkin Rosemary Bagels

When I told my best friend I was making bagels today, she first asked if they were hard to make and then asked if they were fried. The answer to both is no, and I'll clear up this bagel mystery by saying they aren't too difficult to make, it's a fun process and if you've made bread and boiled water, you can make bagels.

Today was pumpkin cooking day with my friend Kelly, so naturally I needed to make a pumpkin bagel. I'm not one for sweet flavored bagels so I thought adding rosemary to the dough and sprinkling them with kosher salt would please me. And it did.


I based my recipe off this fine one at SweetSpatulas.com.

I did not have any wheat flour so I used only white and I really like the texture.

Ingredients:
4 cups white flour
4 tsp. yeast
1 cup warm (not hot!) water
1.5 tsp. salt
2 Tbs. chopped fresh rosemary, extra for sprinkling on top if you like
1/2 cup brown sugar
3/4 cup pumpkin puree
1 tsp. ground allspice
2 tsp. cinnamon
1 egg

Directions:
Combine the yeast, rosemary and two cups of flour in a large mixing bowl or the bowl to your KitchenAid mixer. In another mixing bowl combine the water, salt, sugar, pumpkin and spices. Add the wet to the dry and thoroughly combine. Slowly start incorporating the remaining flour. I switched to the KitchenAid hook and let the machine go for about 3 minutes.

Remove the dough and knead on a floured surface till you have an elastic, smooth ball. Place in a bowl and cover for 15 minutes.


Divide the dough into eight equal balls. Make them as round and smooth as you can and punch a hole in the center of each ball. Dust each hole with a little flour. Use your thumbs and fingers to shape the hole evenly so it's two inches in diameter. Place on a lightly greased baking sheet. Cover with a towel and let sit for 20 minutes.


Meanwhile, turn on your broiler and set two big pots of water on the stove to boil.

Why boil bagels, you ask?

Well...according to thekitchn.com, boiling them is what gives them that signature crust and also helps with the classic chewiness.

Now you know! Let's continue with the bageling.

Place your bagels under the broiler for 1.5 minutes. You could turn them and broil the other side, but I didn't do that and they turned out fine. Next, place two or three bagels at a time into the boiling water. Let them boil on each side for one minute. While this is going on, whisk your egg in a bowl and set aside.


Using tongs, gently place your boiled bagels back on the cookie sheet. Brush with the egg and sprinkle with chopped rosemary and kosher salt.

When all the bagels are boiled, egged and sprinkled, bake them for 25 minutes or until the tops are nicely brown.


Let cool on a rack. Serve with cream cheese and revel in the fact that you just made bagels.


10/4/13

Roasted Carrots in a Honey Dijon Rosemary Glaze

Recently I've been poking around online newspapers from the little villages around Alaska. Something I've noticed is that they frequently feature recipes sent in from the locals.

I came across a glazed carrots recipe from a radio station in Petersburg, Alaska (population 3,000). I really want to give the station all the credit, but upon closer inspection, I discovered it was lifted from The Healthy Foodie blog.

My dad was roasting a leg of lamb and had first dibs on the oven, which was set at 350 degrees. So I opted to use the gas grill as an oven. The temperature wasn't consistent, but the carrots turned out perfectly caramelized, garlicky, mustardy and a delicious side dish for lamb.

Here's the link to the original blog post, since I'd like to give credit where it's due. Also, her photos are a heck of a lot better.


Ingredients:
 1 pound medium sized carrots
 2 Tbs. olive oil
 2 Tbs. honey
 1 Tbs. Dijon mustard
 1 Tbs. fresh rosemary, finely chopped
 2 cloves garlic, minced
 salt and pepper to taste

Directions:
  • Preheat oven to 425 degrees.
  • Brush the carrots under running water. Cut them in half lengthwise and crosswise and set them aside.
  • In a medium bowl, whisk together the olive oil, honey, mustard, rosemary, garlic, salt and pepper. Add the reserved carrots. Toss to coat evenly and spread in a single layer in a shallow baking sheet lined with parchment paper.
  • Place in the oven and bake for 20-25 minutes, turning once or twice, until the carrots are tender and golden.

9/30/13

Italian Inspiration -- A Small Tribute to Marcella Hazan

My father informed me that Marcella Hazan died yesterday at age 89. If you aren't familiar with this Italian cookbook author, you really ought to look her up. In my family we didn't own a copy of "Mastering the Art of French Cooking." Our Julia Child was Marcella Hazan. Our family's copy of The Classic Italian Cookbook is covered in stains and drips from meals past, a true testament to the respect my father gave to Marcella Hazan's recipes.

A few years ago I realized that my aunt and uncle have an even more tattered copy of this cookbook, which means her recipes are truly embedded in my family's culture.

What I love about Hazan's recipes is their simplicity -- there aren't too many ingredients or difficult preparations. She writes it how it is. She also includes a summary of what to serve with each dish and the page numbers for the corresponding recipes.

For instance, last week I made Pollo in Tegame al Limone, Pan-Roasted Chicken with Lemon Juice. At the end of the recipe she suggests, "To begin -- Stuffed Lettuce Soup, Risotto with Celery, or Small Macaroni with Peas and Peppers. With the chicken serve Gratin of Cauliflower with Béchamel Sauce, Smothered Lettuce with Pancetta (do not serve this if you served lettuce soup first), or Gratin of Zucchini with Tomato and Herbs."

As a tribute to this legendary cook, I present just a few of my favorite recipes from her books "The Classic Italian Cookbook" and "More Classic Italian Cooking" that I have blogged about over the years.


Minestrone alla Novarese - The long simmering of pancetta and red cabbage give this traditional soup a deep, rich flavor.


Italian Cheeseburgers with Homemade Pasta and Cheese -- these burgers are so flavorful and juicy, you don't even miss the bun!


Classic Blender Pesto -- this is by far the most referenced recipe in my family. We make pesto at least once a month from homegrown basil.

9/21/13

Simple Knitted Boot Cuffs

Don't know how much Game of Thrones you've been watching, but Winter is Coming.

That means scarves and coats and mittens and boots! Knitting season is officially on so why not start off with a super simple project to give your new fall outfits a little more refinement?


These boot cuffs can be made in just a couple of hours. Nothing fancy, but they are the perfect touch for those cute brown boots you've been waiting all summer to wear. You won't have to worry about bulky wool socks and hot feet when your boot cuffs are peeking out.

Here's what you need:

Bulky yarn -- less than one skein
Size 10, 16-inch circular needle
Darning needle


Cast on 48 stitches on your circular needle. Join the round, making sure not to twist the row.

K2, P2 around.

Repeat for 20 rounds.

Loosely cast off. Weave in ends.

Repeat for other cuff.

Wear as is or decorate with a cute button.

Easy as pie! Cute as cake?


LinkWithin

Related Posts Plugin for WordPress, Blogger...