

Showing posts with label Sewing. Show all posts
Showing posts with label Sewing. Show all posts
3/4/14
I've Moved!
I've decided to stop updating Knit Nat AK and post solely on Alaska Knit Nat. See you on Wordpress!
2/23/14
Quick Craft - Lace Curtains to Pillowcases
Our living room throw pillows needed an upgrade. At $20-30 a pop, I wasn't about to buy two new ones, so I dug through my fabric stash and found an old lace curtain panel. Two cuts and four seams later I had a couple of gorgeous throw pillows.

Here's how.
Materials:
1 lace curtain panel
2 square pillow forms
straight pins
sewing machine

Directions. Lay out your curtain panel on the floor and place your pillow on top of it to measure how much fabric to cut. If you have a removable slip cover on the pillow already, then remove it and use the cover as a guide. Cut the curtain widthwise, leaving a half an inch of seam allowance on the top and bottom edge.

I made an envelope slip cover, but instead of the envelope being on the back side, like most throw pillows, it is on the front because the lace trim is already a finished edge and it looks so pretty overlapped.
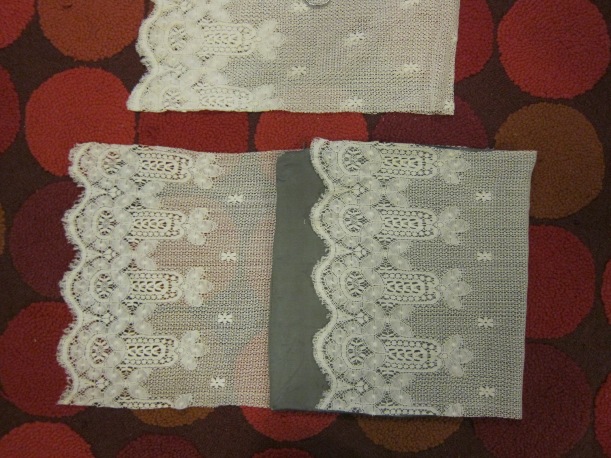
Lay your pillow on the long width of fabric and figure out how you want it to overlap. Fold one edge over the pillow and the other edge over. Mark where you folded and remove the pillow. Refold the lace and pin the raw edges in place.
Sew across both edges. Turn right side out and stuff your pillow inside. That's it! Repeat with second pillow.


Questions? Leave me a comment!
11/28/13
The Easy Way to Line a Hat
I could knit hats all day, but ask me to line a hat and chances are I'll never do it. Something about measuring a head, cutting out fabric and sewing it into a hat seems like way too much work.
I was recently deconstructing a cashmere turtleneck for another project and was trying to figure out how to use the turtleneck tube. Headband? Too ugly. Hat lining? Perfect.

Here's how to line a hat with minimal effort. Just some scissors, pinning and whip stitches.
What you'll need:
An old turtleneck
Fabric scissors
A person's head (not yours)
Straight or safety pins
Needle and thread
Directions:
Cut the tube of the neck away from the body of the sweater. I cut below the seam so it wouldn't unravel over time.
Turn the tube inside out and put it on a head with the seam in the back.

Put the hat over the tube and line it up the way you'd like it (if there's a seam to the hat, it should also be in back). Let the hat overhang the tube by 1/4 inch.
Pin the tube to the hat all the way around. This way it will remain stretched out as you sew it and won't cause the hat to pucker.
Remove the tube and hat from the head and thank your head for its assistance.
With thread matching the color of the hat, whip stitch the lining to the inside of the hat, trying to sew into the inside knitted stitches so as not to reveal the thread on the outside of the hat. The following photos are from a different hat and turtleneck.

That's it! Now your hat is warmer and cozier.
I was recently deconstructing a cashmere turtleneck for another project and was trying to figure out how to use the turtleneck tube. Headband? Too ugly. Hat lining? Perfect.

Here's how to line a hat with minimal effort. Just some scissors, pinning and whip stitches.
What you'll need:
An old turtleneck
Fabric scissors
A person's head (not yours)
Straight or safety pins
Needle and thread
Directions:
Cut the tube of the neck away from the body of the sweater. I cut below the seam so it wouldn't unravel over time.
Turn the tube inside out and put it on a head with the seam in the back.

Put the hat over the tube and line it up the way you'd like it (if there's a seam to the hat, it should also be in back). Let the hat overhang the tube by 1/4 inch.
Pin the tube to the hat all the way around. This way it will remain stretched out as you sew it and won't cause the hat to pucker.
Remove the tube and hat from the head and thank your head for its assistance.
With thread matching the color of the hat, whip stitch the lining to the inside of the hat, trying to sew into the inside knitted stitches so as not to reveal the thread on the outside of the hat. The following photos are from a different hat and turtleneck.

 |
| Inside-out view |
That's it! Now your hat is warmer and cozier.
11/9/13
Quick Craft: DIY Heart Shirt
Shirts with big hearts are big right now, but despite the fad I actually think they are pretty cool.


I've had a few old cashmere sweaters awaiting crafting and this was the perfect short-attention-span craft: cut out a heart, sew it on a shirt.

My husband had the idea of sewing on the heart with contrasting embroidery thread. It not only gives it some "pop," but it also adds more of a homemade touch.
Here's what you'll need:
An old sweater
A plain shirt
A large piece of paper or newspaper
chalk
Thin, double-sided fusible interfacing or Stitch Witchery
Embroidery thread
iron
large needle

1. Make a heart template to your liking. I just folded an 11 x 17 piece of paper in half and cut out a heart shape.


2. Place your heart template on the sweater and use chalk to trace the shape. Cut your shape out of the sweater.
3. Figure out where you'd like the heart to be placed on your shirt. Cut strips of interfacing or Stitch Witchery and place them on the shirt. Lay your heart, right side up, on top of the strips and fiddle around to get everything centered and flat. The photo below just shows where I placed the Stitch Witchery. In reality, the strips should not be facing up.

4. Iron the heart according to interfacing instructions, so it fuses to the shirt. This way it won't slip around when you're sewing and you won't have to worry about pins sticking you as you sew.
5. Cut a long piece of embroidery thread and straight stitch around the edge of the heart. Secure thread with a couple of knots on the inside when finished.

Ta-da!

9/4/13
Quick Craft! -- How to Undorkify a Sweatshirt
I've never been much for sweatshirts. The collars always seem too tight and the cuffs are too....cuffy? But lately I've been finding some really comfortable sweatshirts that look a little more flattering, such as this Lands End tunic:


Although $30 isn't a lot for a sweatshirt, a craft challenge was calling my name. Could I take a dorky thrift store sweatshirt and make it cool?

I can't tell you, but what I came up with is a lot more wearable; and it only took about 15 minutes. Hello Esprit! The epitome of awesome in the early 90s. Did you notice the double ribbing? Oh yeah, you could really work a church bake sale in this bad boy.
This is a no-sew craft, by the way.
Here, take a look again that this great shirt. Click on it for a larger view.

Materials:
1 thrift store sweatshirt in your size
1 shirt with a collar shape you prefer
fabric scissors
sewing machine (optional)
chalk
Directions:
Lay the thrift store shirt out on a flat surface, front side up. Place the shirt you like on top of it with the shoulder seams matching up as best you can.
Find the lowest part of your shirt collar in the front and mark it with chalk on the thrift shirt. Do the same with the collar shape at the shoulders. You're just using your own shirt as a guide. Remove your shirt and with the chalk draw a curve to mark your new collar shape.

Do the same with the back of the shirt.
Starting at a shoulder seam, carefully cut along your line.
Ta-da! New collar. Now you could pin under the cut edge and sew a hem around, which I did. But it looks pretty good without doing that.

For the sleeves, I just cut around the top part of the cuff, thus removing the cuff altogether. Roll up your sleeves and you're done.
Bingo boingo! Fast craft.
7/5/13
The Best Way to Hem Jeans

Have you ever gotten your jeans professionally hemmed? It looks all neat and tidy and they even manage to keep the original hem. If you have basic sewing skills and a sewing machine, then hemming your jeans is easy. Save yourself the alteration charge. Learn to shorten your jeans and keep the original hem. This is the best kind of project because it takes about 15 minutes. Here's what you'll need:
- Jeans that are too long
- Straight pins
- Sewing machine
- Ruler or tape measure
- Stitch Witchery double fusible tape (optional)
 |
| Newly hemmed -- and you can't even tell! |
First, try on your jeans and figure out how much length you'd like to take off by folding up the cuff and measuring from the edge to the fold. With today's pair I wanted them to be two inches shorter.
Take your measurement and divide it in half. This is how much you're going to sew away. Remove your jeans (and continue crafting without pants if you'd like) and now fold up the edge of your jeans till the fabric below the hemline measures half of what you'd like to remove. In my case, I want to remove two inches, so I make sure there is one inch of fabric folded below the hem. Pin in place.

Start your seam in the inner leg and sew right below the edge of the original hem. Repeat with other leg.

You are now basically done and if you are truly lazy you could walk away from this project now. But why not make them look perfect? It will only take a few more minutes.
Turn your jeans inside out and iron the fold you just made. Iron the whole "flap" you just created upward. Take your Stitch Witchery and cut a couple of strips that are long enough to be tucked under the flaps. You may need to trim the tape if the flap is narrower than the tape's width. Sorry, no photo, but it's really not that hard. You're just fusing the flap to the leg so it doesn't flop around when you wear the jeans. Press your hot iron on the flap, using steam, for about 20 seconds and *PRESTO* your flap has been fused to the leg.* I love Stitch Witchery. It's one of my favorite sewing notions.


Now, admire your professionally hemmed jeans and how you saved, like, $15.

*If you are shortening your jeans by a lot, such as more than four inches, I would consider cutting the flap till it's about an inch wide and running a zig zag stitch around the raw edge (which used to be a fold). Then fuse this flap to the leg.
5/26/13
Old Rain Jacket ===> Baby Rain Pants in 20 Minutes

Jack has been recently introduced to the outdoors that isn't covered in snow. It's too warm for a snow suit and he keeps mucking up his regular pants. What I really needed for him was a pair of outdoor pants.
I'd long ago posted about making pants from t-shirts and I've also made baby pants from sweater sleeves. Wouldn't it be perfect to cut up an old rain jacket and make pants out of it? Usually rain jackets have adjustable wrist straps, which would totally work to tighten over baby boots. Yes, it can be done!
And thanks to a church rummage sale yesterday, I did it for less than a dollar.
Here's how.
Ingredients:
One large adult rain jacket or windbreaker. Adjustable wrist straps preferred
chalk
fabric scissors
pins
one foot of half-inch wide elastic
large safety pin
sewing machine
one pair of pants that already fit your baby
This project is super simple. You literally only sew two seams and then sew up the elastic. It took me 20 minutes from start to finish.

Directions:
You'll be using an existing pair of pants as a pattern. Turn them inside out. Take one leg and turn it right side out. Tuck it inside the other leg so it looks like you have a one-legged pair of pants. Fold the pants so the inseam is along the edge. Ta-da! Pants pattern. Study how this looks because you'll be doing this later.

Lay your pattern on top of one of the jacket sleeves so the hem of the pant leg is the end of the sleeve.
Using chalk, mark the rise and waistband of your pants, about an inch away from the pattern on the rise and three inches above the waistband. This isn't an exact science, but you want enough room in the waistband area so you can fold it down twice and still be able to fit a diaper.
Cut your sleeve along your markings. My jacket had a breathable liner, which I decided to keep 'cause it worked out that way.

Lay the leg you just cut on top of the other sleeve and follow along those cut lines for the second leg. You are now halfway done with your project.


Turn one leg inside out. As you did with your "pattern," tuck the right-side-out pant leg inside the leg you turned inside out. Line up the cut edges along the rise and pin in place. Sew this one seam. I double stitched it in case Jack is rough on them.

Un-tuck the legs and you should have an inside-out pair of pants with no waistband.

Fold down the waist about 3/4 inch and fold it down again so there are no raw edges. Pin all around the waist.

Turn the pants right side out and sew around the waistband, making sure there is just over a half-inch space to run the elastic through. Leave a small part unsewn so you can run the elastic through. You could do this with the pants inside out, but I like knowing what the outside seam looks like cause I sew totally crooked.


Put a safety pin through the end of the elastic and run it through the waistband. Use the pattern pants as a guide for how tight to make the elastic, or use your child as a model. Mine was sleeping so I winged it. When you've decided how tight the elastic should be, sew both ends of the elastic together with a zig-zag stitch back and forth a few times.

Sew over the opening in the waistband.
Put pants on your baby and let him get dirty out there!

7/2/12
Hooded Baby Towel and Mitt Set -- A Tutorial
Our son is a tall little fellow and store bought hooded towels are too short for him. I want him to be bundled up and cozy after a bath so I decided to make my own hooded towel out of a plush bath towel.
Here's how you can make one too.
Materials:
1 large towel
Sewing machine
Heavy duty needle (optional, but makes the job easier)
Fabric scissors or rotary cutter
Directions:
1. Fold your towel lengthwise or "hot dog" style. Cut a 12 to 14-inch piece from one end.

2. Turn under the raw edge of the big piece and pin in place. With a straight stitch sew across. Go back along this seam with a zig zag to prevent the towel from unravelling. Since my towel had stripes I didn't pin. I just made sure the stripes lined up.

3. Take the big piece and line up one corner on top of the 12-inch piece with the finished edge of the small piece on the bottom. The finished edge is going to be the edge of the hood. You're going to cut a triangle form the little piece so you want to make sure it's the right shape of triangle. I eyeballed how big to make the triangle. I just imagined it as the hood and how big my baby's head is.

4. Cut out the two edges of the triangle and pin it to the corner of the big piece. Save the scraps.


5. Sew along the two edges with a straight stitch.
6. Turn the triangle inside out and there's your hooded towel!

For the mitt:
1. Place your hand on the scrap of towel to figure out how tall you want your mitt. Fold your scrap in half and cut out a rectangle with one side being on the fold.


2. Unfold your rectangle and turn under one of the long edges and sew down.
3. Fold the rectangle in half with the turned under edge on the outside (right sides together) and sew the raw edges.

4. Turn right side out and there's your mitt!
 |
| He's not too sure about this bath thing... |
Here's how you can make one too.
Materials:
1 large towel
Sewing machine
Heavy duty needle (optional, but makes the job easier)
Fabric scissors or rotary cutter
Directions:
1. Fold your towel lengthwise or "hot dog" style. Cut a 12 to 14-inch piece from one end.

2. Turn under the raw edge of the big piece and pin in place. With a straight stitch sew across. Go back along this seam with a zig zag to prevent the towel from unravelling. Since my towel had stripes I didn't pin. I just made sure the stripes lined up.

3. Take the big piece and line up one corner on top of the 12-inch piece with the finished edge of the small piece on the bottom. The finished edge is going to be the edge of the hood. You're going to cut a triangle form the little piece so you want to make sure it's the right shape of triangle. I eyeballed how big to make the triangle. I just imagined it as the hood and how big my baby's head is.

4. Cut out the two edges of the triangle and pin it to the corner of the big piece. Save the scraps.


5. Sew along the two edges with a straight stitch.
6. Turn the triangle inside out and there's your hooded towel!

For the mitt:
1. Place your hand on the scrap of towel to figure out how tall you want your mitt. Fold your scrap in half and cut out a rectangle with one side being on the fold.


2. Unfold your rectangle and turn under one of the long edges and sew down.
3. Fold the rectangle in half with the turned under edge on the outside (right sides together) and sew the raw edges.

4. Turn right side out and there's your mitt!
Subscribe to:
Comments (Atom)