

Showing posts with label Knitting. Show all posts
Showing posts with label Knitting. Show all posts
3/4/14
I've Moved!
I've decided to stop updating Knit Nat AK and post solely on Alaska Knit Nat. See you on Wordpress!
1/13/14
Preemie Football Hat -- Free Pattern
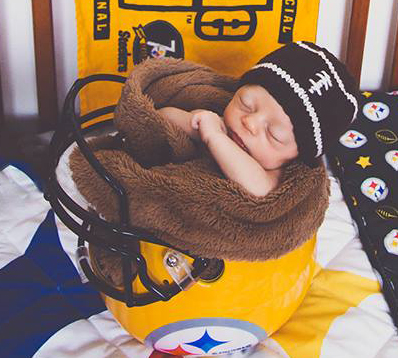
My friend Laura asked me to make her new little one a tiny football hat. I was definitely up to the challenge. I was surprised how few knitted patterns there were floating around Pinterest. Most of the patterns are crochet, which can be made very quickly, but for a football hat I think knit has more room for detail.
This hat is so cute and teeny! It's based on a tiny Steelers hat I made Laura's second child a couple of years ago.
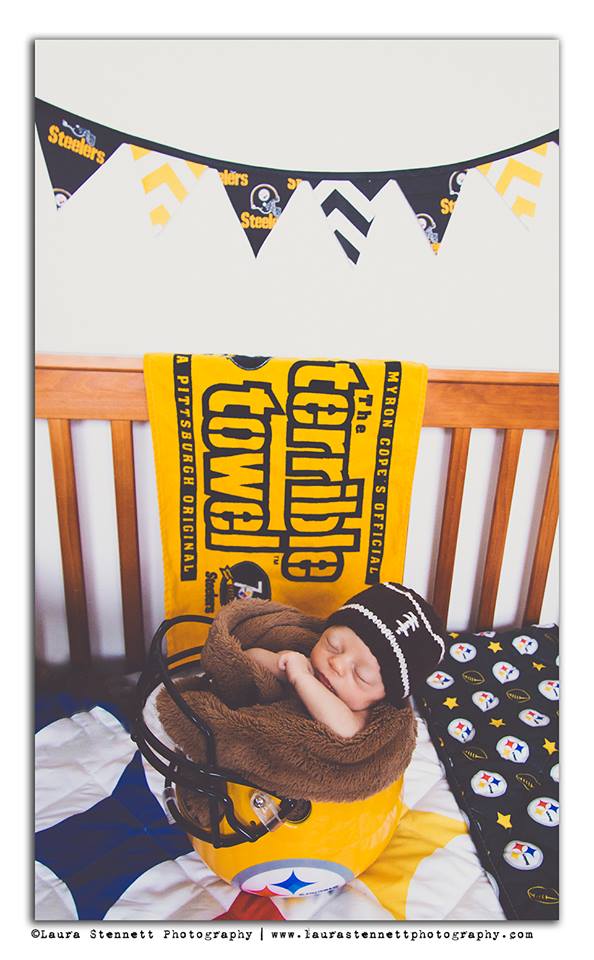
- Photo courtesy of www.laurastennetphotography.com
Materials:
Red Heart Brand worsted yarn in white and brown
size 8 double pointed needles
darning needle
Abbreviations:
k1, p1 = knit one, purl one ribbing
k2tog = knit two stitches together
Directions:
With your double pointed needles, cast on 56 stitches (14 stitches per needle) in brown. Join your work, being sure the stitches aren't twisted and k1, p1 rib for three rounds.
Knit two rounds regularly and switch to the white. No need to cut the brown yarn. Knit two rounds in white and cut leaving an 8-inch tail. Bring up the brown and knit 15 rounds. Knit two rounds white without cutting the brown. Cut the white leaving an 8-inch tail and knit one round in brown. Decrease as follows:
*k2tog, k6* Repeat * till end of round
K one round
*K2tog, k5*, repeat * till end of round
K one round
*K2tog, k4*, repeat * till end of round
K one round
*K2tog, k 3*, repeat * till end of round
K one round
*K2tog, k 2*, repeat * till end of round
K one round
*K2tog, k1*, repeat * till end of round
*K2tog*, repeat * till end of round.
Cut yarn leaving an 8-inch tail. Using a darning needle, weave in all ends.
K one round
*K2tog, k5*, repeat * till end of round
K one round
*K2tog, k4*, repeat * till end of round
K one round
*K2tog, k 3*, repeat * till end of round
K one round
*K2tog, k 2*, repeat * till end of round
K one round
*K2tog, k1*, repeat * till end of round
*K2tog*, repeat * till end of round.
Cut yarn leaving an 8-inch tail. Using a darning needle, weave in all ends.
For the football stitches, thread a darning needle with a 24-inch length of white yarn. On the front of the hat, whipstitch the vertical line using short diagonal stitches stacked on top of one another. Then run three wide stitches perpendicular to the vertical line. Tie off the yarn and weave in the end.
To make this hat for a newborn-3 month size, cast on 64 stitches and follow the same pattern.
12/22/13
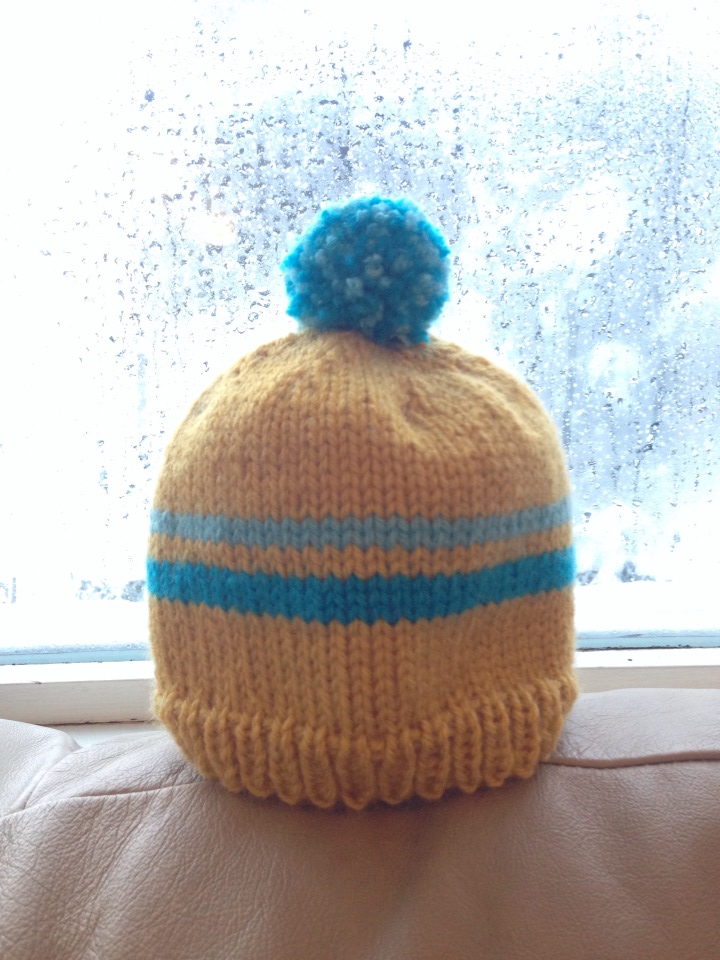
Retro Baby Ski Hat -- Free Pattern
I'm getting down to the knitty gritty here for Christmas presents. I just had one more hat on my list and that was for my best friend's new baby.
I knit this up in just a couple of hours -- and you can too with this simple pattern.
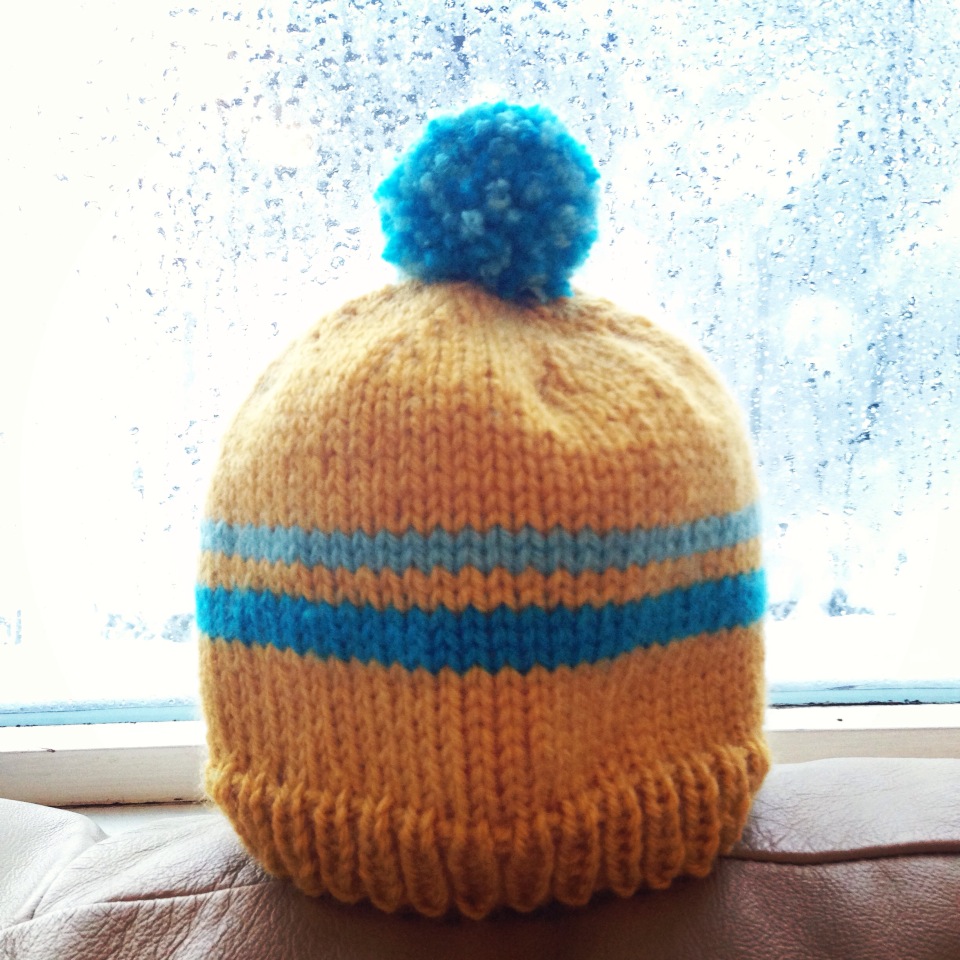
Retro Baby Ski Hat -- for a 3-6 mo. baby
Materials:
Vanna's Choice worsted weight yarn -- mustard, teal and light blue
Size 9 circular needles
size 9 double pointed needles
darning needle
large fork or pom pom maker
Abbreviations:
k1, p1 = knit 1, purl 1 ribbing
k2tog = knit two stitches together
Directions:
With your circular, cast on 64 stitches with mustard color and knit last stitch to first stitch without twisting the stitches. K1, P1 for six rounds. Knit 8 rounds in stockinette stitch.
Switch to teal and knit three rounds. Do not cut mustard yarn.
Cut teal yarn with an 8-inch tail. Switch to mustard yarn and knit two rounds.
Switch to light blue and knit two rounds. Do not cut mustard yarn.
Cut light blue yarn with an 8-inch tail and knit 10 rounds with mustard.
Begin decrease as follows:
Place a marker if you need to, but I can tell where the beginning of the round is based on the stripes.
K2tog, K6, repeat till end of round
Knit one round
K2tog, K5, repeat till end of round
K one round
K2tog, K4, repeat till end
K one round while transferring to double pointed needles. Or knit the round and transfer stitches — whatever’s easier for you.
K2tog, K3, repeat till end
Knit one round
K2tog, K2, repeat till end
Knit one round
K2tog, K1, repeat till end
K2tog, repeat till end.
Cut yarn leaving a long tail. With darning needle, draw up remaining stitches and weave in all ends.
For the pom pom:
Take both the teal and light blue yarn and wrap them around a large serving fork till it's pom pom sized. With a doubled piece of yarn about one foot long, tie the yarn around the middle tine and remove from the fork. Cut the loops and trim pom pom to your liking. Using a darning needle, attach to top of hat. To better secure pom pom, run the yarn back up through the pom pom and back down into the inside of the hat.
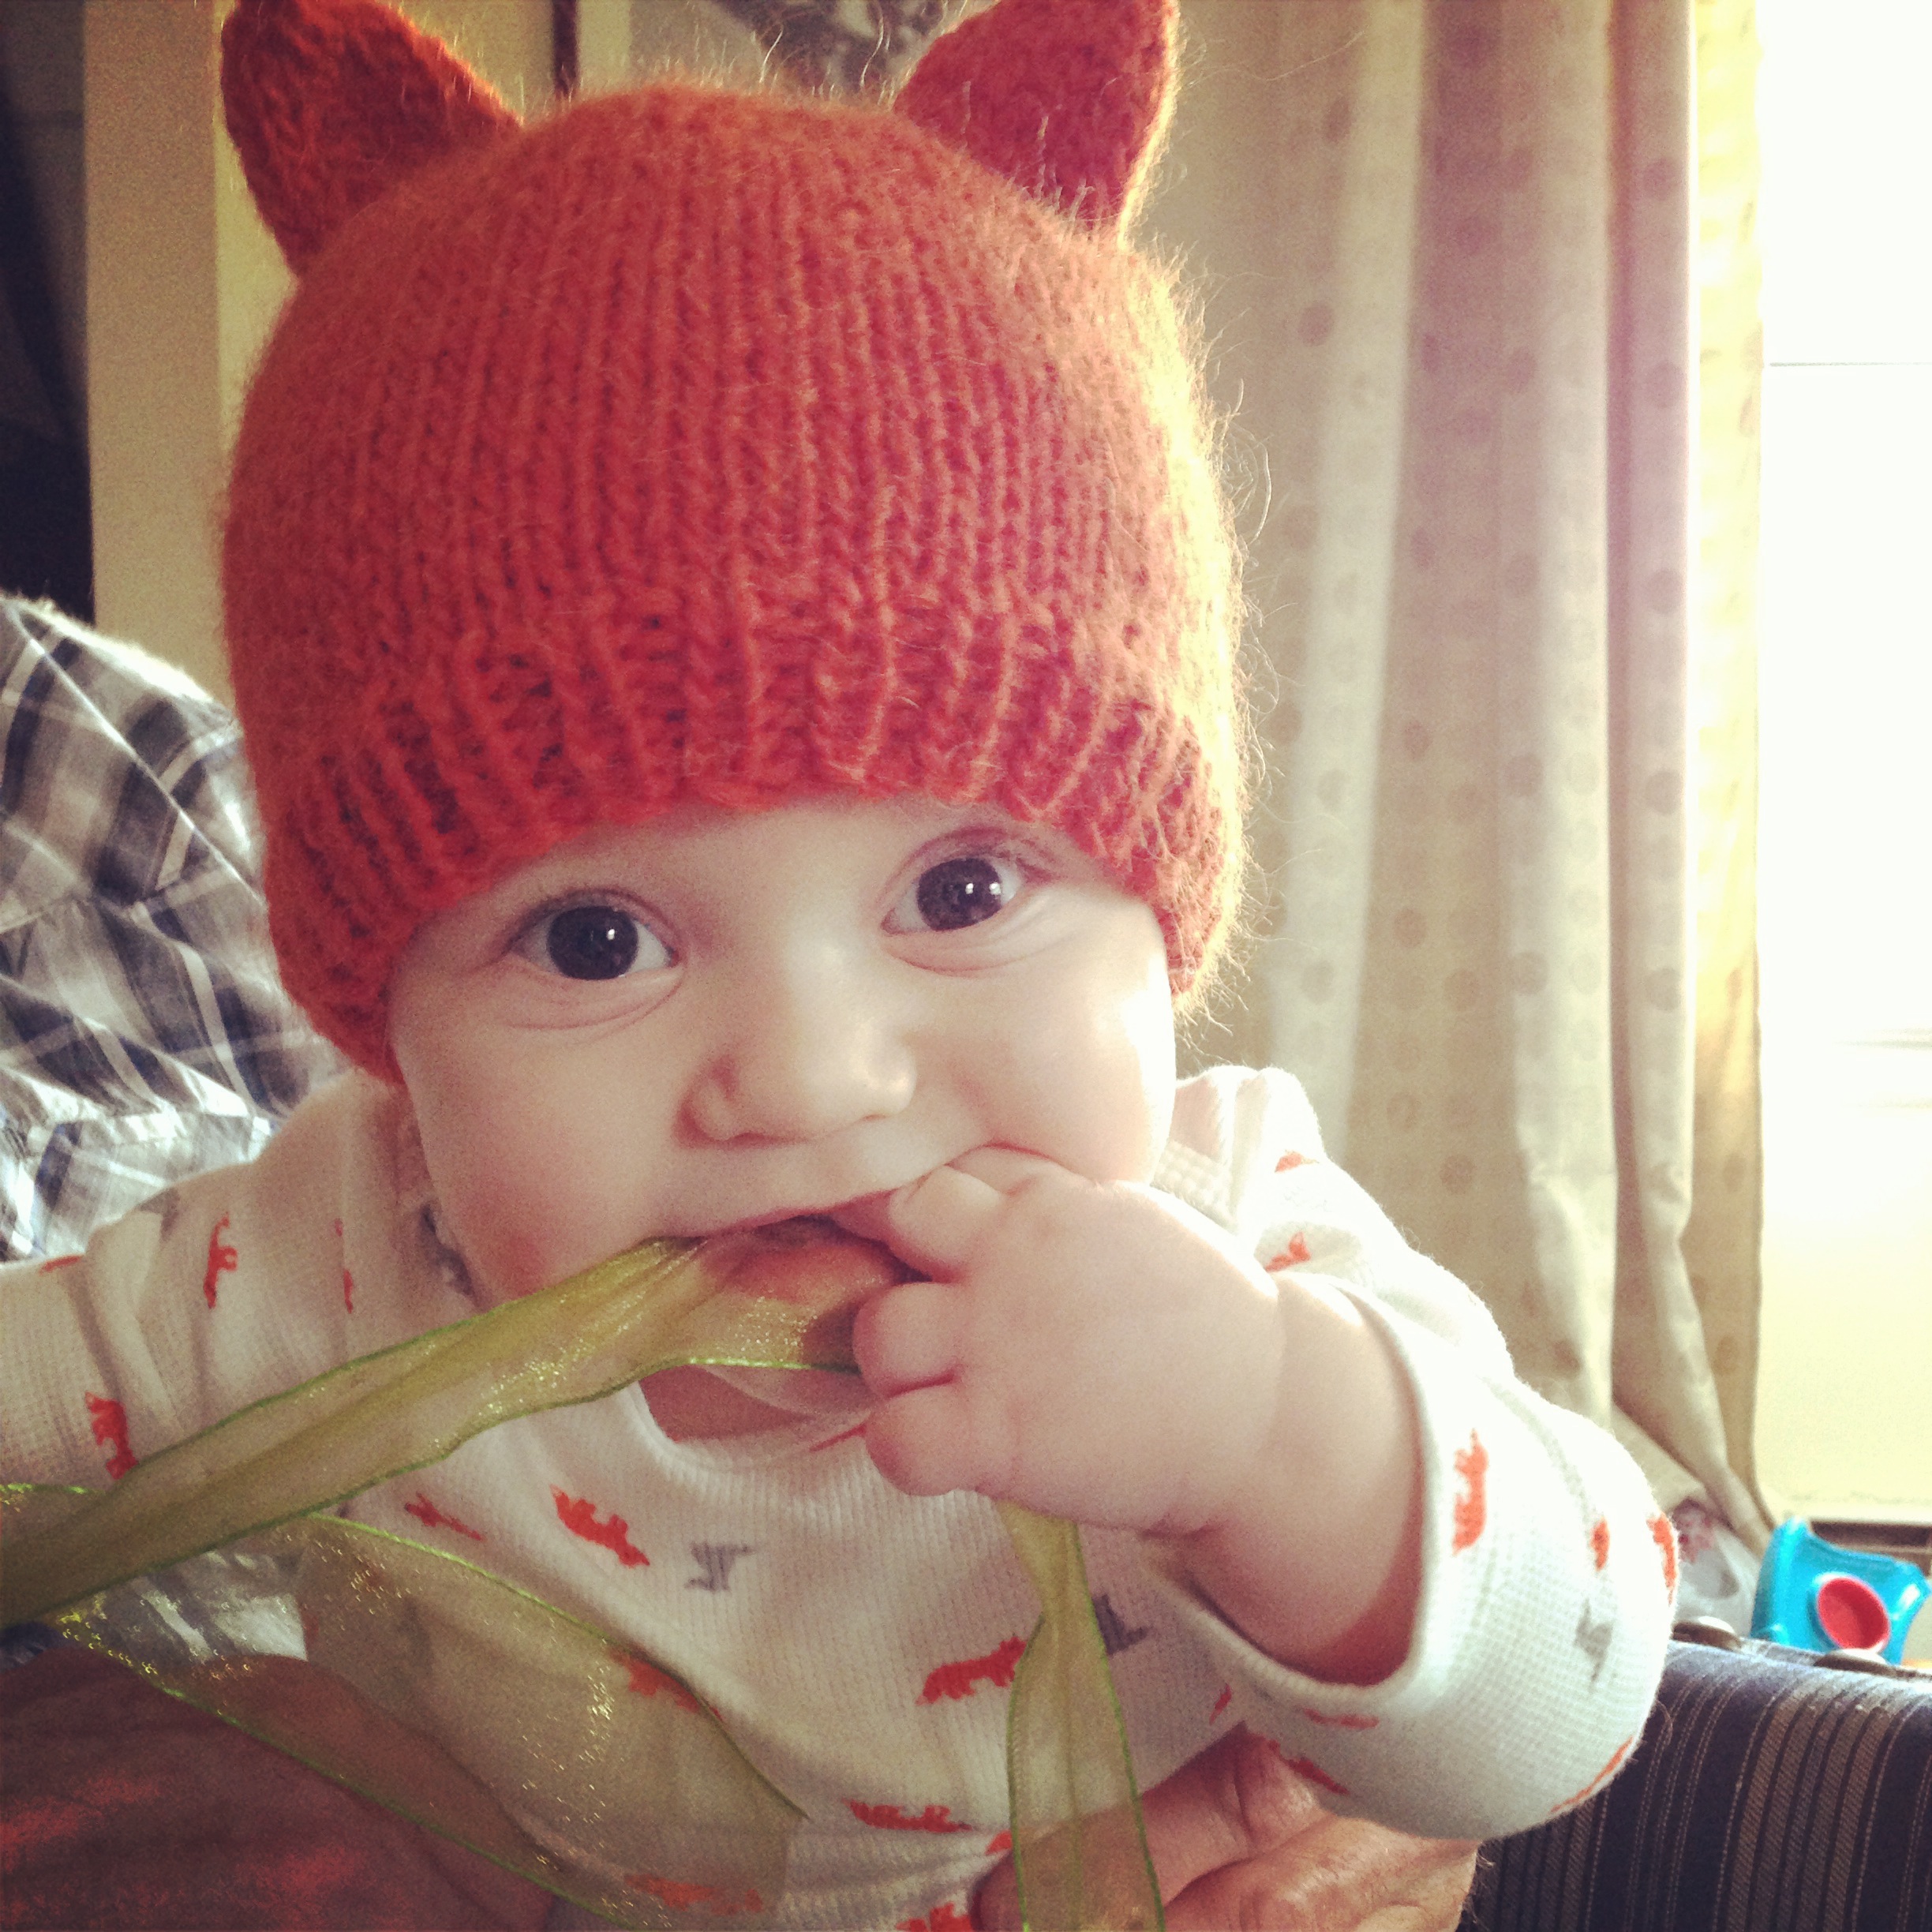
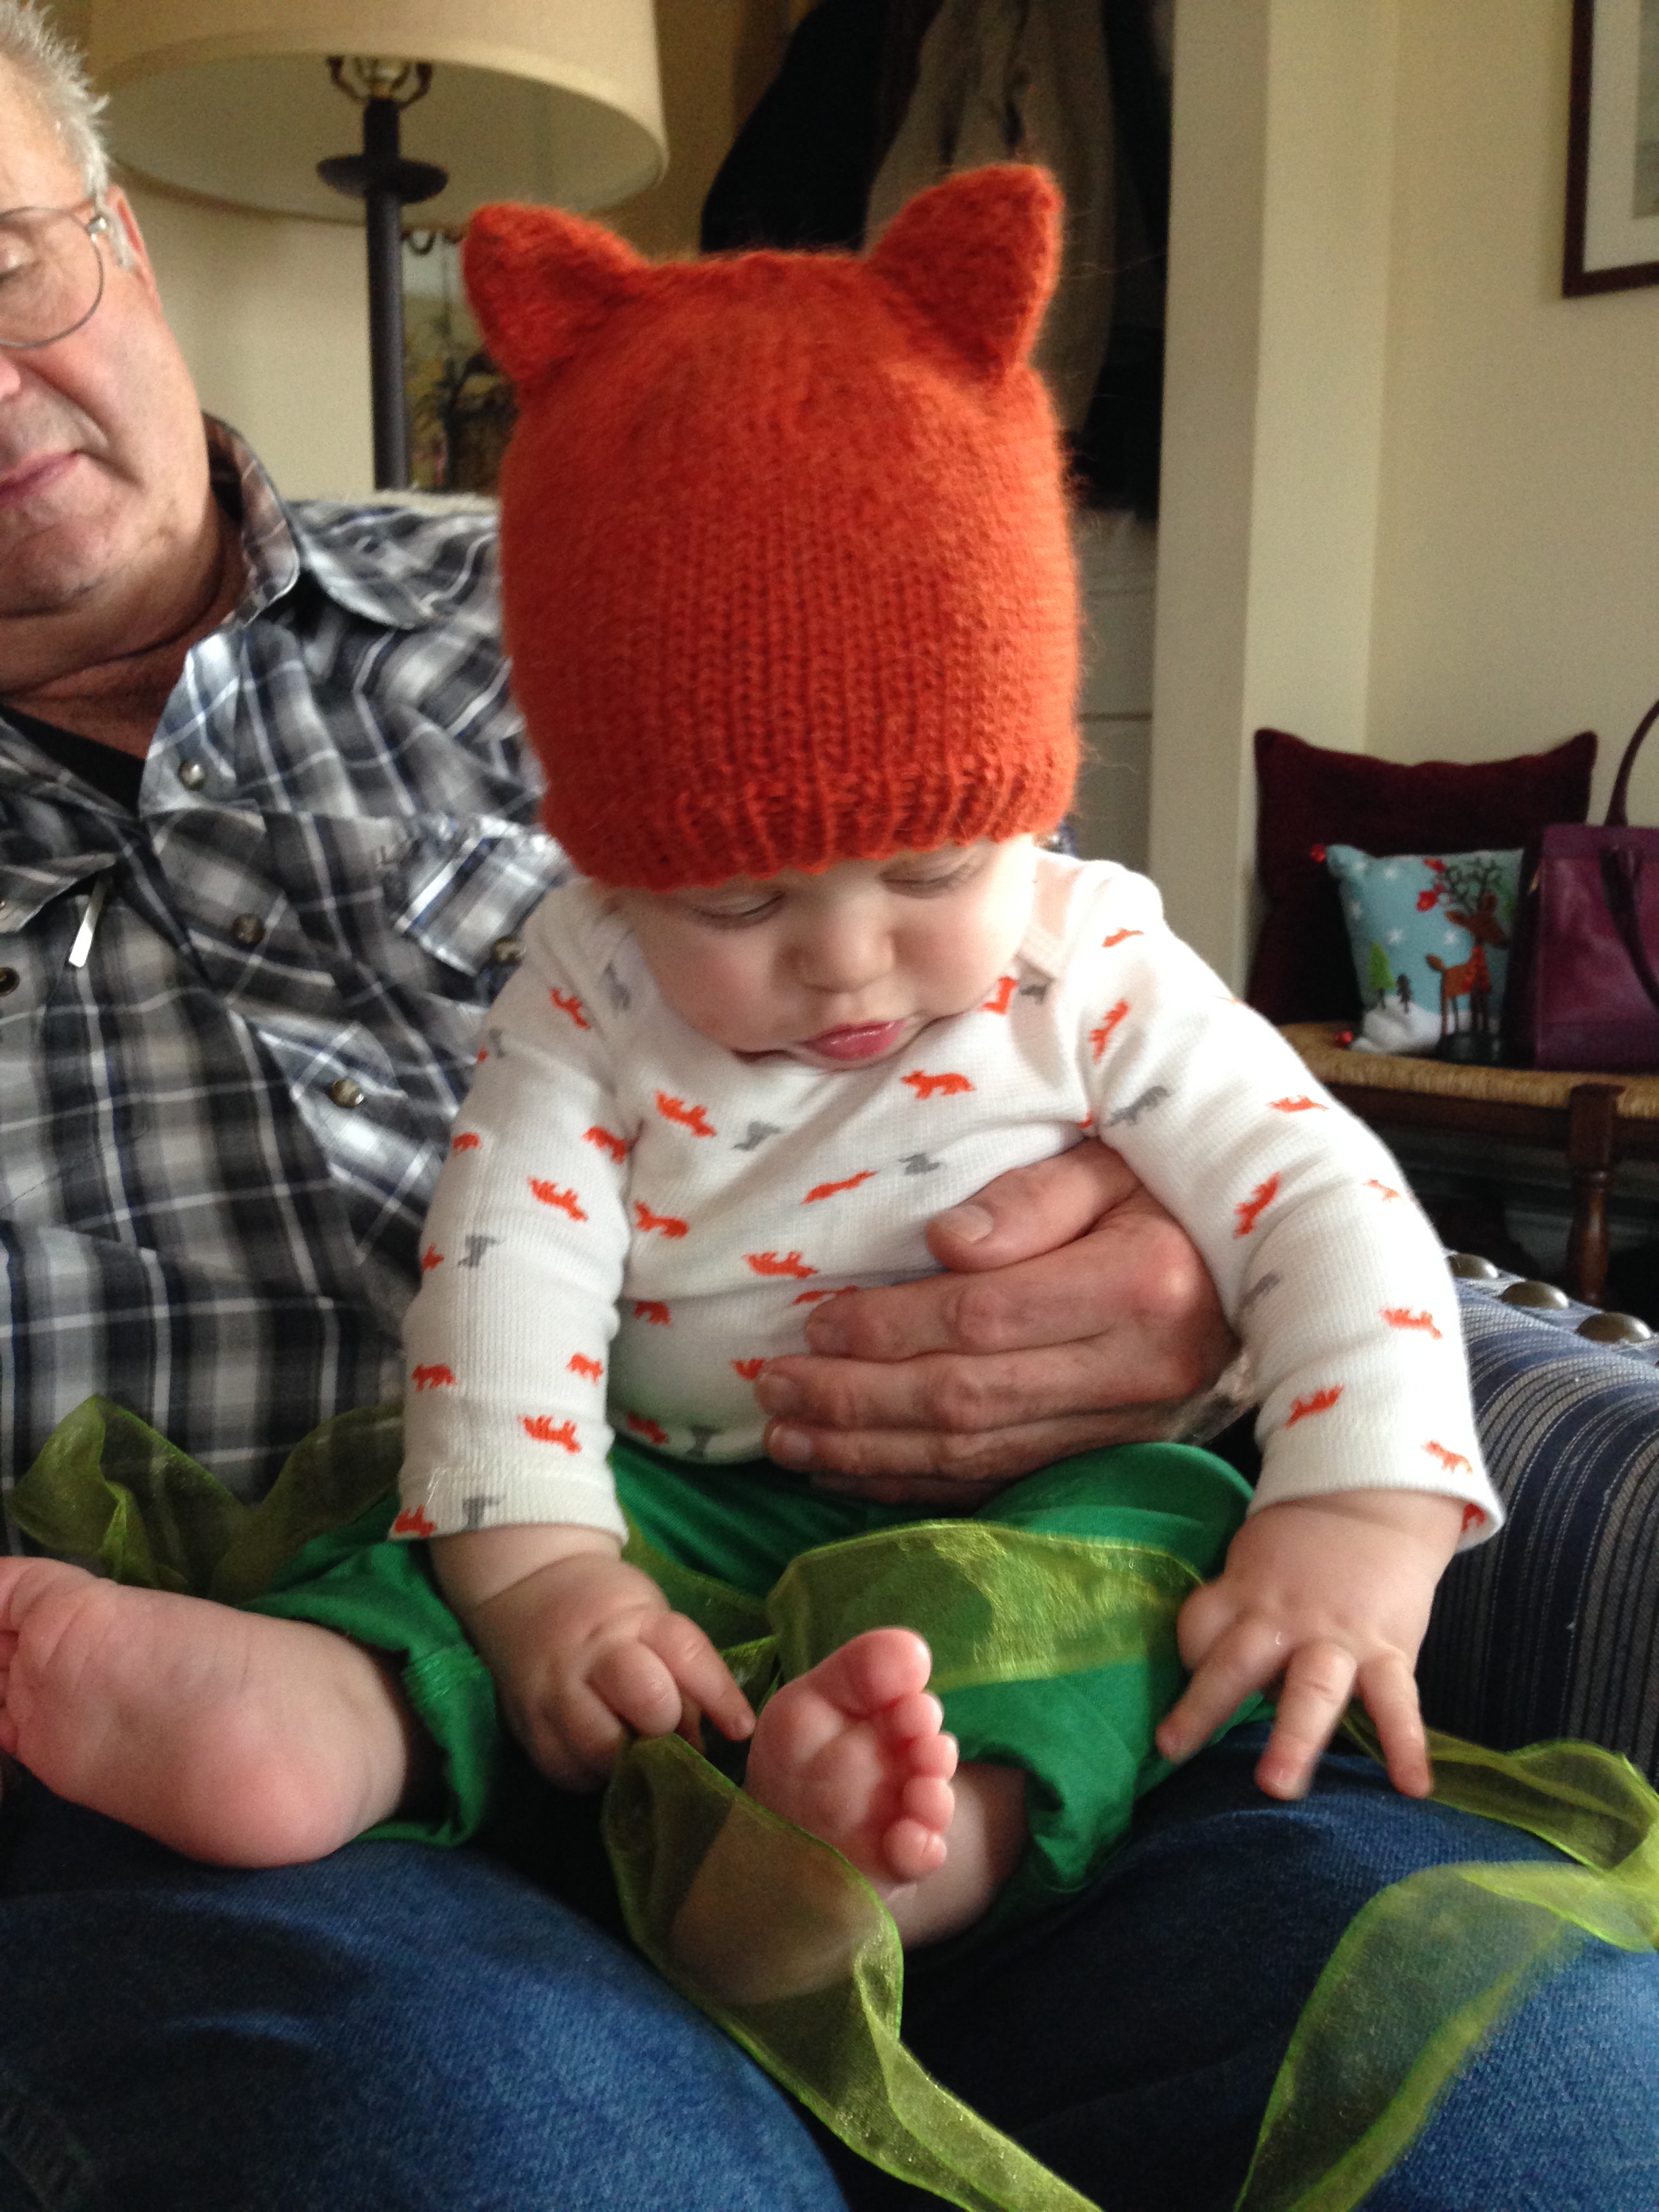
Simple Fox Hat -- Free Pattern
In case you haven't noticed, foxes are really in right now. This season I've already crocheted a nifty fox basket and sewn several felt fox ornaments. I really wanted to make a fox hat for a friend's baby, but I'm pretty terrible at fair isle and halfway through my first attempt, I scratched the whole thing. The snout was all scrunched and I didn't like the look of it.
I decided on something much simpler -- my regular old hat pattern with some ears sewn on top. I winged the ears, but I really like how they turned out. For this project I used some Montera Classic Elite llama/wool chunky yarn I'd been coveting for some time. This hat is fuzzy, warm and downright delightful.
Here's what you need:
1 skein of orange chunky yarn (I used Bolsita Orange from Montera Classic Elite)
size 9, 16-inch circular needle
one set of size 9 double pointed needles
darning needle
Size: This pattern fits a 12-18-month baby. For a larger hat (2T-3T), cast on 72 stitches and follow the same pattern. For a smaller hat, knit this same pattern on size 8 needles.
Gauge: I do not gauge my work, but according to Montera yarn's website, it should be 3.5-4 sts/inch on size 9 needles.
Abbreviations:
k2tog= knit two stitches together
For the main body of the hat, cast on 64 stitches on the circular needle and knit last stitch to first stitch without twisting the stitches. Knit 1, purl 1 ribbing for five rounds. Knit in stockinette stitch for 22 more rounds, or until piece measures about 5.5 inches.
Decrease as follows:
Place a marker at beginning of round.
K2tog, K6, repeat till end of round
Knit one round
K2tog, K5, repeat till end of round
K one round
K2tog, K4, repeat till end
K one round while transferring to double pointed needles. Or knit the round and transfer stitches — whatever’s easier for you.
K2tog, K3, repeat till end
Knit one round
K2tog, K2, repeat till end
Knit one round
K2tog, K1, repeat till end
K2tog, repeat till end.
Cut yarn leaving a long tail. Run the yarn through the remaining stitches with a darning needle and draw up the hole tight. Weave in ends.
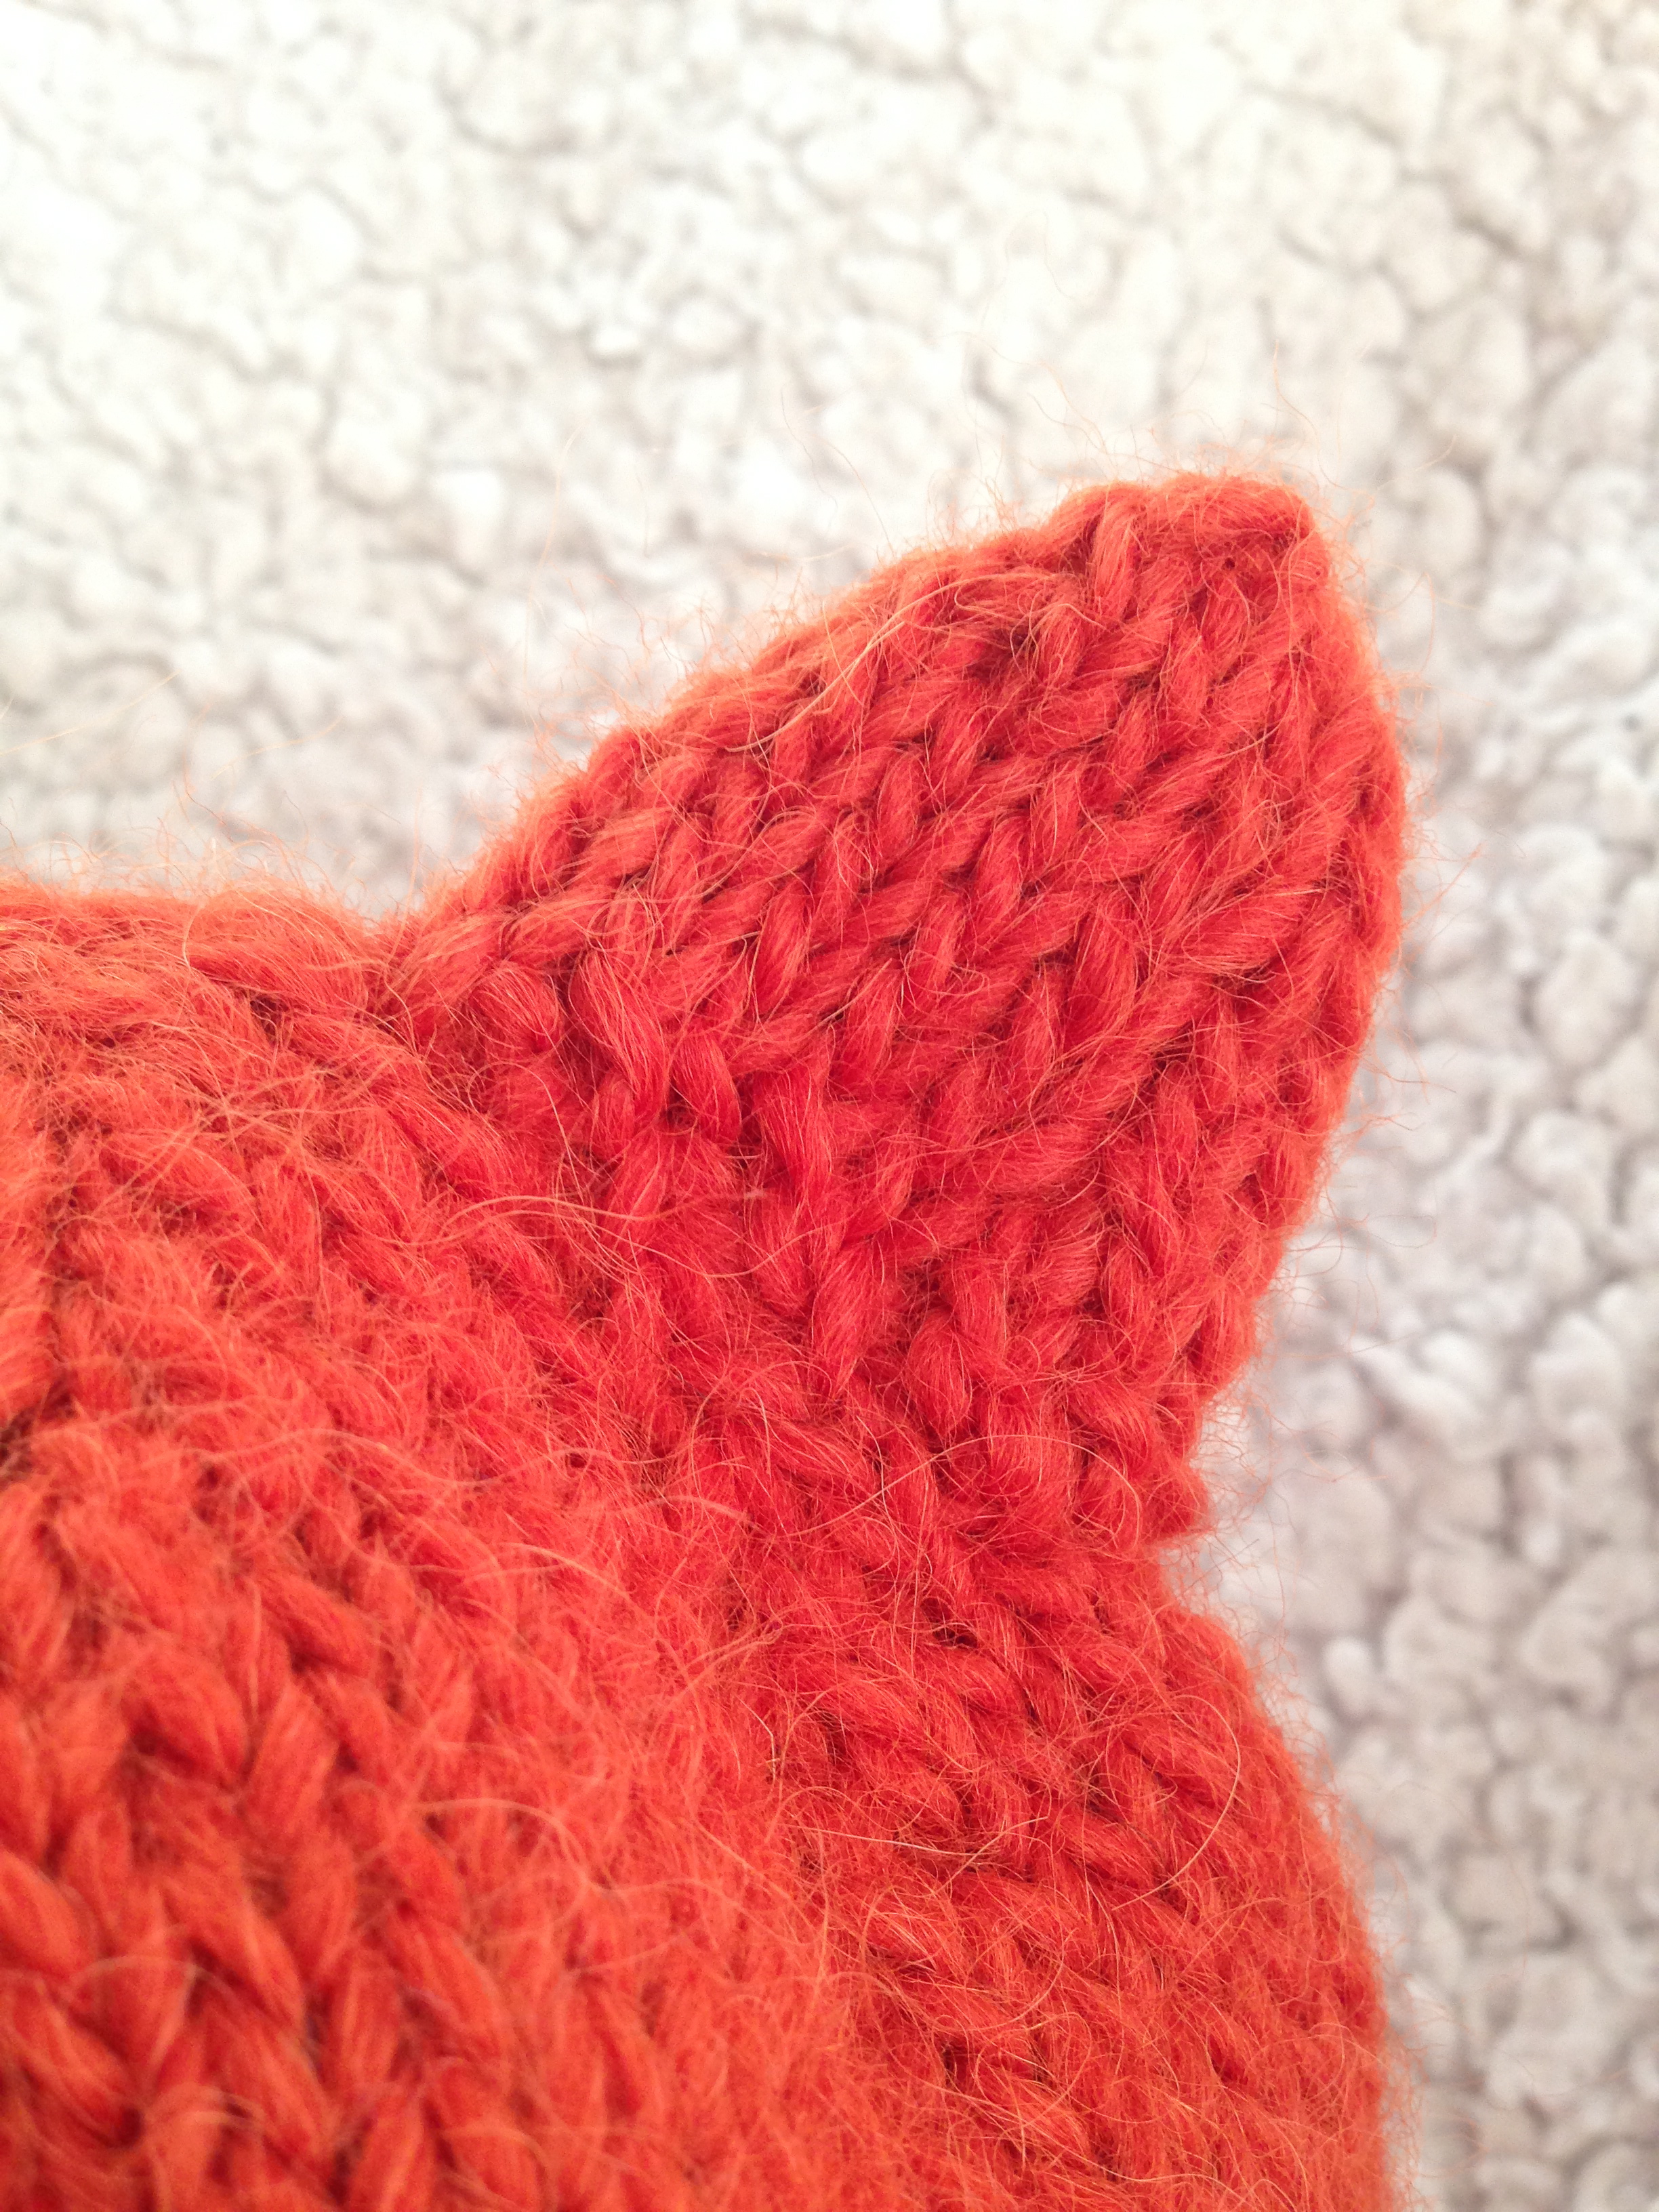
Ear (make 2):
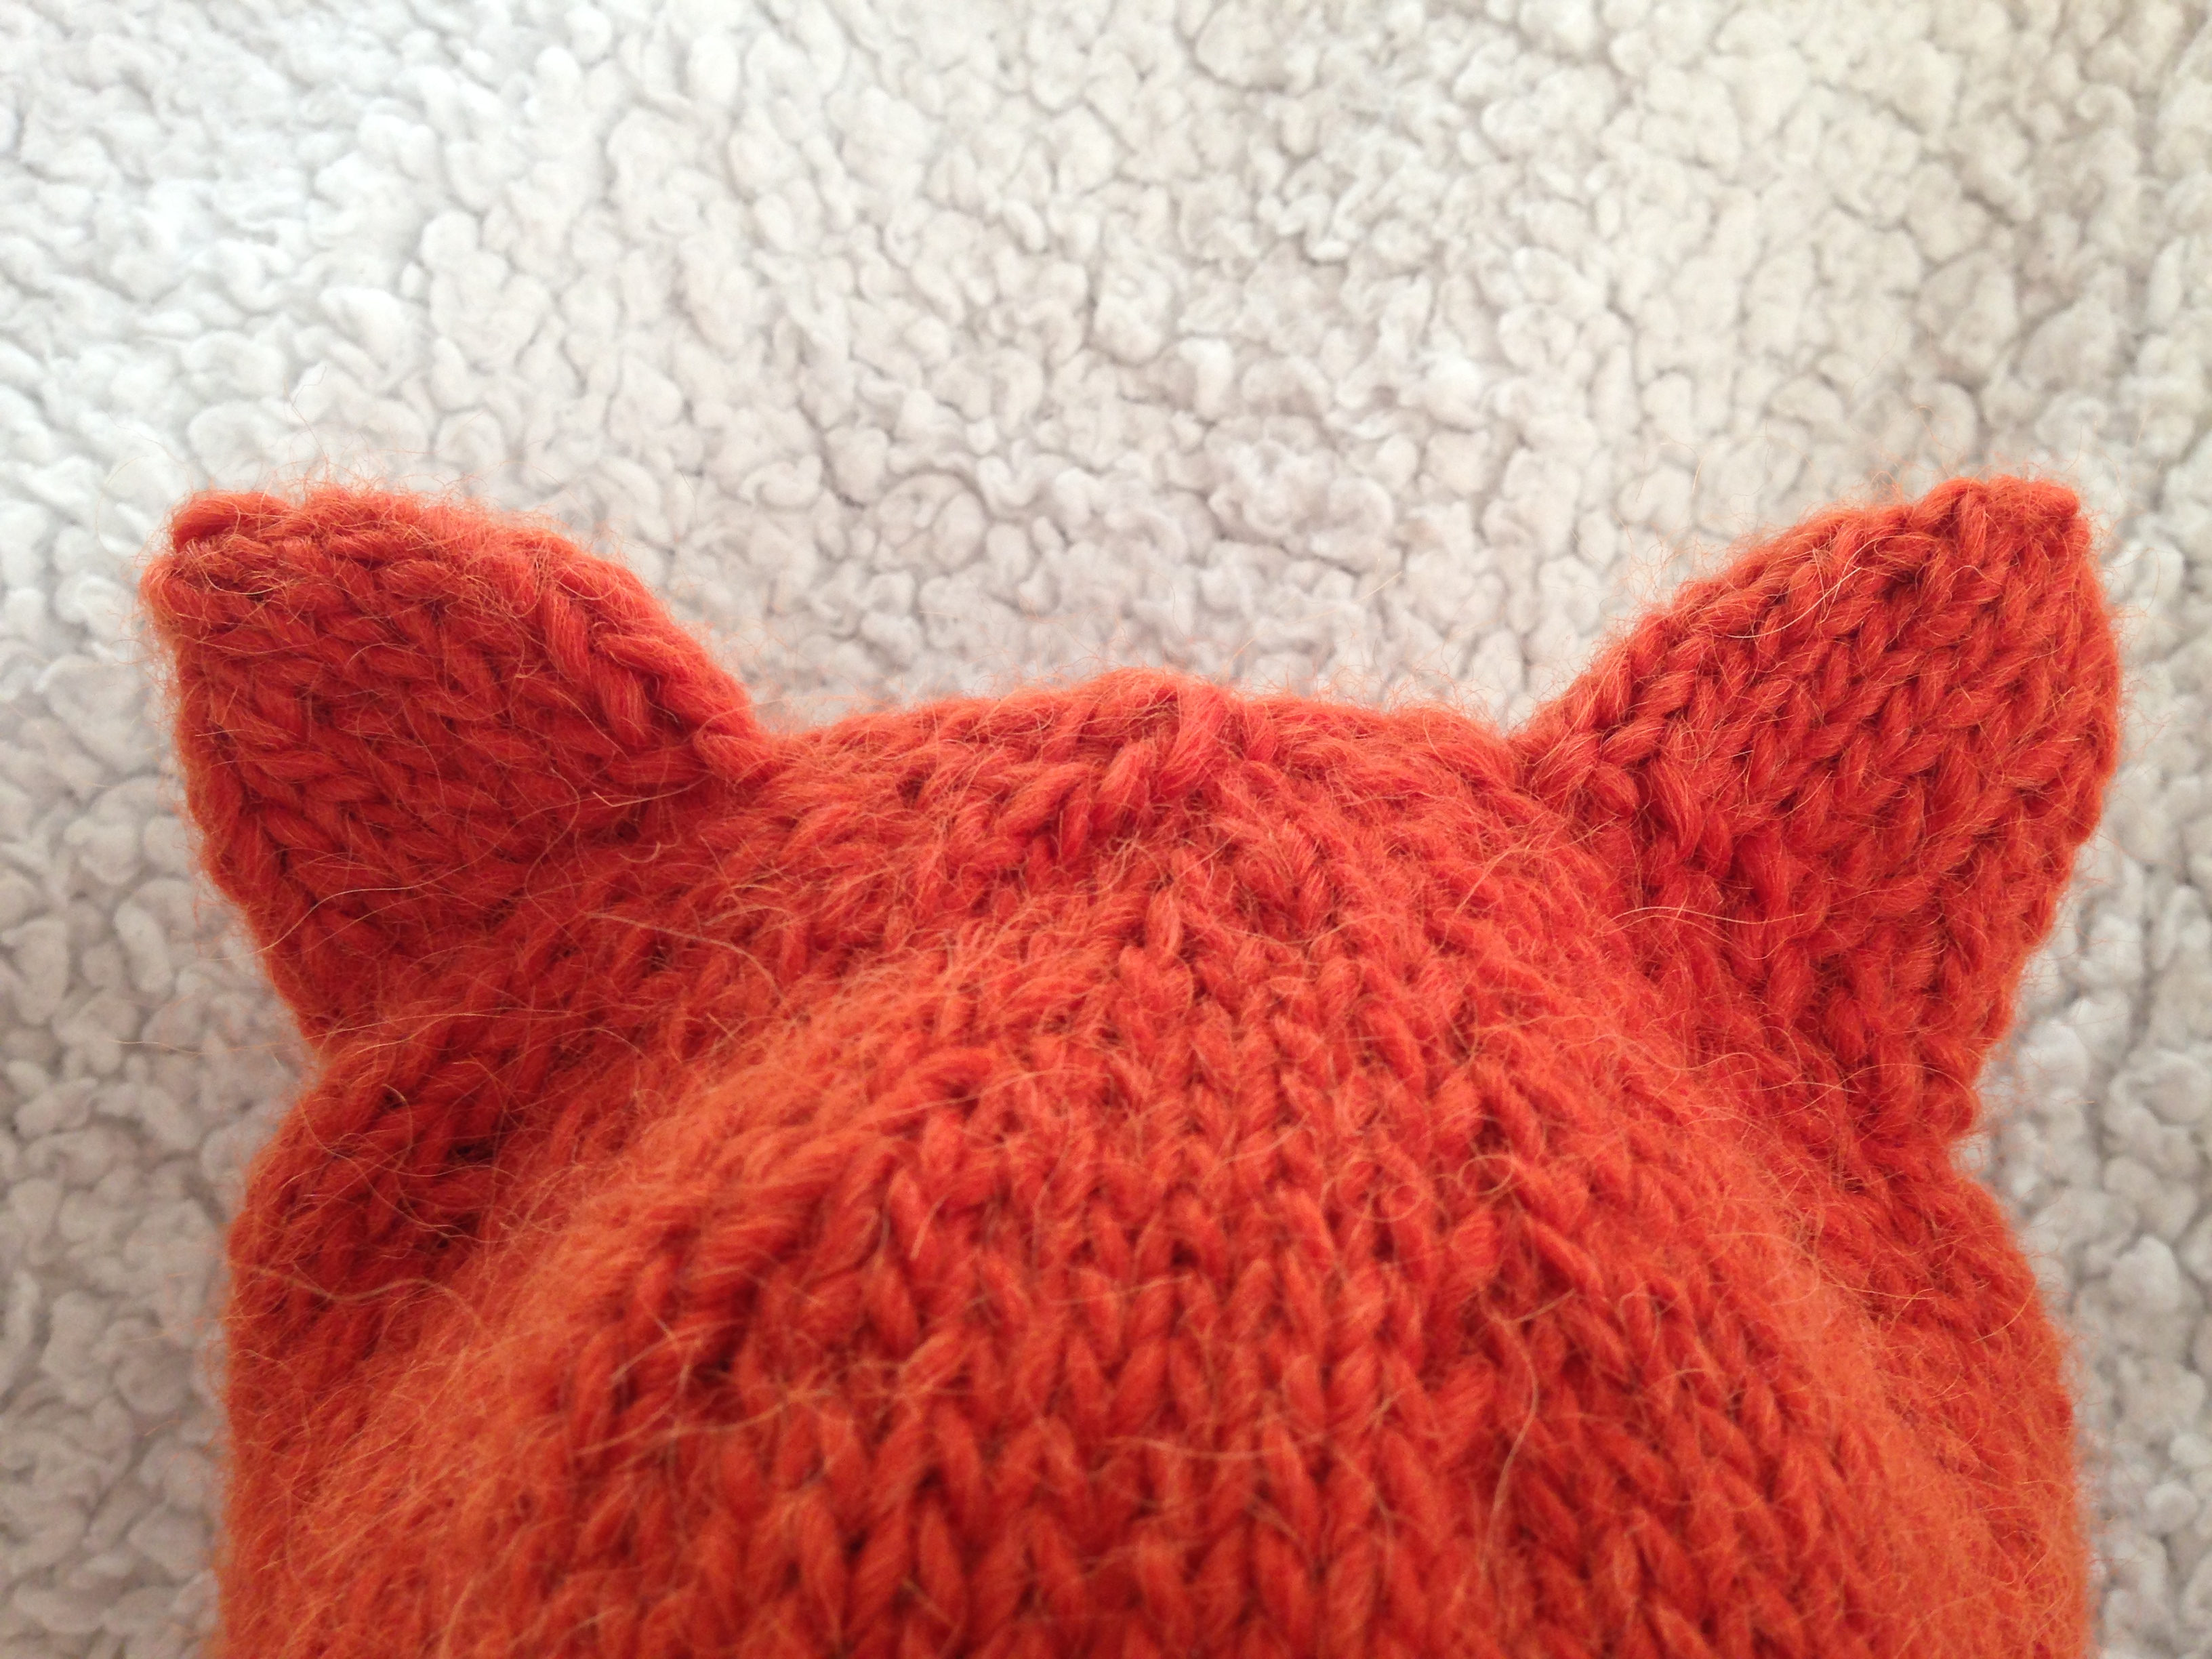
With three double pointed needles, cast on 16 stitches (5, 5, 6), leaving a 12-inch tail. Connect last stitch to first stitch and begin knitting in the round. Knit 3 rounds.
K2tog, k3, K2tog, k3, K2tog, k4
Knit 2 rounds
K2tog, k2, k2tog, k2, k2tog k3
Knit 1 round
K2tog, k1, k2tog, k1, k2tog, k2
Cut yarn leaving a 6-inch tail. Run yarn through the remaining stitches and draw up tight. Weave in the end on the inside of the ear.
With your darning needle and the long cast-on tail, sew the bottom of the ear closed.
As for sewing on the ears, I folded my hat in half and determined the best placement of the ears. I sewed each ear on with the remaining length of cast-on yarn. I didn't use any special technique for sewing, so I recommend whatever you feel most comfortable with. I actually didn't have enough cast-on yarn so I did some touch ups with extra yarn.
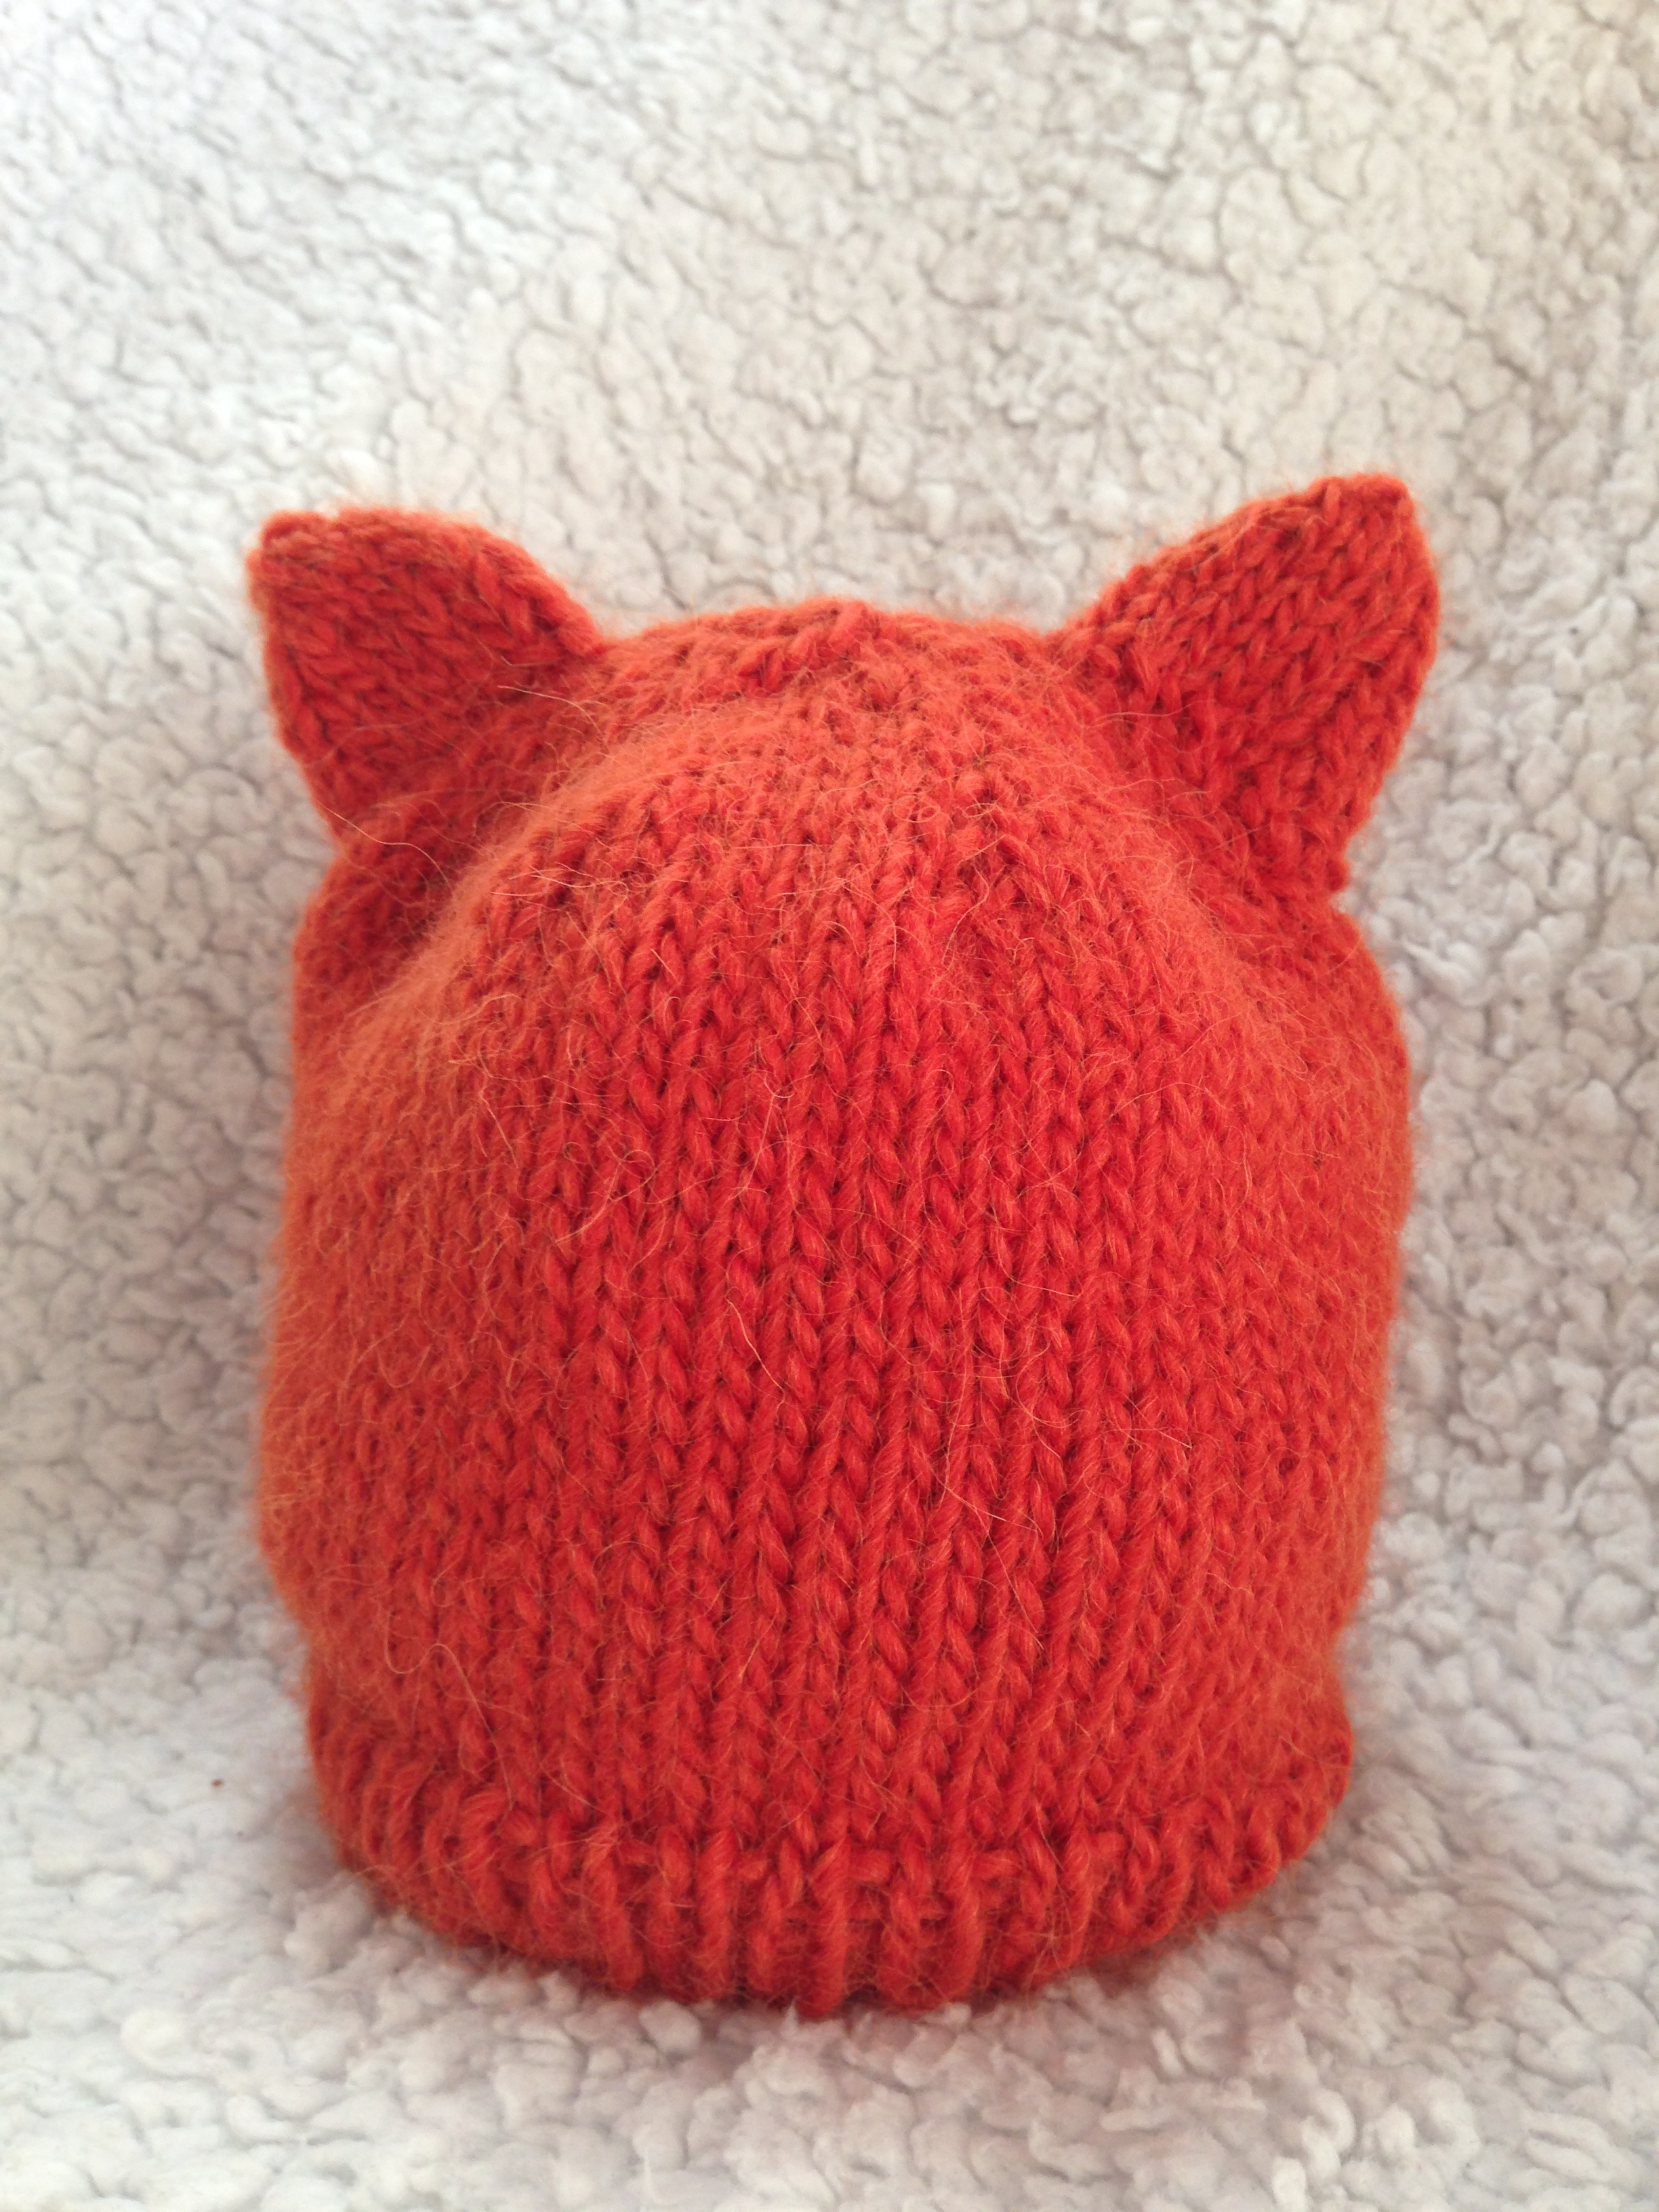
Now it's up to you whether to stitch a little nose and eyes on the front of the hat. I decided not to as I figured the child's face would be the fox's face. Either way would be cute!
11/28/13
The Easy Way to Line a Hat
I could knit hats all day, but ask me to line a hat and chances are I'll never do it. Something about measuring a head, cutting out fabric and sewing it into a hat seems like way too much work.
I was recently deconstructing a cashmere turtleneck for another project and was trying to figure out how to use the turtleneck tube. Headband? Too ugly. Hat lining? Perfect.

Here's how to line a hat with minimal effort. Just some scissors, pinning and whip stitches.
What you'll need:
An old turtleneck
Fabric scissors
A person's head (not yours)
Straight or safety pins
Needle and thread
Directions:
Cut the tube of the neck away from the body of the sweater. I cut below the seam so it wouldn't unravel over time.
Turn the tube inside out and put it on a head with the seam in the back.

Put the hat over the tube and line it up the way you'd like it (if there's a seam to the hat, it should also be in back). Let the hat overhang the tube by 1/4 inch.
Pin the tube to the hat all the way around. This way it will remain stretched out as you sew it and won't cause the hat to pucker.
Remove the tube and hat from the head and thank your head for its assistance.
With thread matching the color of the hat, whip stitch the lining to the inside of the hat, trying to sew into the inside knitted stitches so as not to reveal the thread on the outside of the hat. The following photos are from a different hat and turtleneck.

That's it! Now your hat is warmer and cozier.
I was recently deconstructing a cashmere turtleneck for another project and was trying to figure out how to use the turtleneck tube. Headband? Too ugly. Hat lining? Perfect.

Here's how to line a hat with minimal effort. Just some scissors, pinning and whip stitches.
What you'll need:
An old turtleneck
Fabric scissors
A person's head (not yours)
Straight or safety pins
Needle and thread
Directions:
Cut the tube of the neck away from the body of the sweater. I cut below the seam so it wouldn't unravel over time.
Turn the tube inside out and put it on a head with the seam in the back.

Put the hat over the tube and line it up the way you'd like it (if there's a seam to the hat, it should also be in back). Let the hat overhang the tube by 1/4 inch.
Pin the tube to the hat all the way around. This way it will remain stretched out as you sew it and won't cause the hat to pucker.
Remove the tube and hat from the head and thank your head for its assistance.
With thread matching the color of the hat, whip stitch the lining to the inside of the hat, trying to sew into the inside knitted stitches so as not to reveal the thread on the outside of the hat. The following photos are from a different hat and turtleneck.

 |
| Inside-out view |
That's it! Now your hat is warmer and cozier.
11/27/13
Baby Candy Cane Stocking Cap -- Free Pattern
My photographer friend commissioned me to make a cute stocking cap for her holiday baby photo shoots.
I've never made anything so tall and pointy, but I think the effect is perfect. Could a baby look more like an adorable naked Christmas elf?
This pattern is for a 3-6 month head. It's also a great introduction to knitting stripes.
Ho ho hope you enjoy it!
Baby Candy Cane Stocking Cap
Materials:
One skein of red worsted weight yarn
One skein of cream worsted weight yarn (I used Red Heart soft)
Size 9 circular needles
Set of 9 double-point needles
darning needle
pom pom maker or large fork
Abbreviation: K2tog = knit two stitches together
Directions:
With the red yarn cast on 64 stitches on your circular needle. Join with first stitch being careful not to twist the stitches. Begin ribbing in k1, p1 for six rounds.
Switch to white yarn and knit 2 rounds. There is no need to cut the red yarn as the rows are so narrow you can easily bring up the other yarn when you need it.
Continue knitting in stockinette stitch for 25 more rounds changing colors every 2 rounds. Transfer stitches to double pointed needles and begin decreasing as follows (while continuing to switch colors every 2 rounds):
*K2tog, k6, repeat * till end of round
knit 3 rounds
*K2tog, k5, repeat * till end of round
knit 4 rounds
*K2tog, k4, repeat * till end of round
knit 6 rounds
*K2tog, k3, repeat * till end of round
knit 15 rounds
*K2tog, k2, repeat * till end of round
knit 16 rounds
*K2tog, k1, repeat * till end of round
knit 5 rounds
*K2tog, repeat * till end of round
k 4 rounds. Cut yarn leaving a 12-inch tail. Using a darning needle, draw up remaining stitches and weave in all ends.
Make your pom pom and sew it to the top.

Happy Holidays from Alaska Knit Nat!
I've never made anything so tall and pointy, but I think the effect is perfect. Could a baby look more like an adorable naked Christmas elf?
 |
| Photo by Laura Stennett Photography |
This pattern is for a 3-6 month head. It's also a great introduction to knitting stripes.
Ho ho hope you enjoy it!
Baby Candy Cane Stocking Cap
Materials:
One skein of red worsted weight yarn
One skein of cream worsted weight yarn (I used Red Heart soft)
Size 9 circular needles
Set of 9 double-point needles
darning needle
pom pom maker or large fork
Abbreviation: K2tog = knit two stitches together
Directions:
With the red yarn cast on 64 stitches on your circular needle. Join with first stitch being careful not to twist the stitches. Begin ribbing in k1, p1 for six rounds.
Switch to white yarn and knit 2 rounds. There is no need to cut the red yarn as the rows are so narrow you can easily bring up the other yarn when you need it.
Continue knitting in stockinette stitch for 25 more rounds changing colors every 2 rounds. Transfer stitches to double pointed needles and begin decreasing as follows (while continuing to switch colors every 2 rounds):
*K2tog, k6, repeat * till end of round
knit 3 rounds
*K2tog, k5, repeat * till end of round
knit 4 rounds
*K2tog, k4, repeat * till end of round
knit 6 rounds
*K2tog, k3, repeat * till end of round
knit 15 rounds
*K2tog, k2, repeat * till end of round
knit 16 rounds
*K2tog, k1, repeat * till end of round
knit 5 rounds
*K2tog, repeat * till end of round
k 4 rounds. Cut yarn leaving a 12-inch tail. Using a darning needle, draw up remaining stitches and weave in all ends.
Make your pom pom and sew it to the top.

Happy Holidays from Alaska Knit Nat!
11/19/13
Pink Elephant Scarf
A few years back I got hooked on a pattern from Pickles.no called the Simple Luxury Scarf. It was indeed simple and I must have made five or six of them.
The pattern calls for two different high-quality yarns to be knitted at once. Each scarf was setting me back about $28.
Now that I'm not able to splurge on every yarn desire I decided to try the pattern with an inexpensive yarn. It turned out great and totally gift worthy. Patons Divine Yarn contains a little wool and mohair so you still achieve the fluffy, luxurious look and feel. I call it scrumptious. And at $4 after a JoAnn's coupon, I call it a great deal.

I didn't refer to Pickles' pattern this time around and it turns out I made it slightly differently, which is why I'm providing my pattern below; but I want to be clear that it originated from Pickles' pattern.
This pattern is for any level of knitter. It's a great way to pass winter weekend where it's -3 degrees outside.
Materials:
1, 100-gram ball of Patons Divine Yarn (I used the Chantilly Rose color)
a long size 15 circular needle
darning needle

Abbreviations:
M1FB = Make 1 stitch in the front and 1 in the back of the same stitch, thus increasing your work by one stitch.
M1 = make 1 stitch
Special note: You'll be using a circular needle only to easily hold a large number of stitches required for this scarf. You will not be joining the work in the round.

Directions:
Cast on 4 stitches.
M1FB into the first stitch. Knit to end of row.
Repeat previous row until you have used most of the yarn.
Final row: M1FB, K1, M1 *K3, M1. Repeat * to end of row. It's ok if you have a few extra stitches at the end. Just knit those. Cast off final row. Using darning needle, weave in ends.

11/14/13
Ice Cream Sundae Hat -- Free Pattern
During my bedtime Pinterest bingeing (I like to call it "pingeing") I came across a lovely knitted hat from http://muitaihania.blogspot.dk/.


I don't know Finnish, but I'm pretty sure the blogger didn't post a pattern for it. *Correction: After 30 seconds of browsing the site, I did find the pattern. Oh well!
So here's my version. It's called the Ice Cream Sundae Hat and it's lovely. I made it up as I went along and the pattern is simple enough that I don't think I need to provide a chart as long as you follow the instructions.

Materials:
3 colors of bulky yarn such as Lamb's Pride Bulky, (Color A, Color B, and Color C)
Size 9 circular needles
Size 9 double-pointed needles
darning needle
pom-pom maker or giant fork
Abbreviations:
K = knit
P = purl
k2tog = Knit two stitches together

Special notes: You'll be knitting a basic fair isle pattern, so carry the unworked yarn across the back of the stitches you're working, being VERY CAREFUL not to pull the unworked yarn too tightly. Your hat will shrink significantly in diameter if you don't pay attention to the unworked yarn. I intentionally made my pattern bigger than my normal hats to account for my habit of pulling too tightly.
On your circular needle, cast on 80 stitches with Color A. Place marker on needle. Knit into the first stitch, being careful the stitches aren't twisted. K2, P2 for five rounds. Knit 3 rounds regularly.
Round 9: With Color A, Knit 3 stitches. *With Color B, knit 4 stitches. With Color A, knit 6 stitches.* Repeat ** till end of round (you'll end by knitting 3 stitches with color A).
Round 10: With Color A, Knit 2 stitches. *With Color B, knit 6 stitches. With Color A, knit 4 stitches.* Repeat ** till end of round, ending with 2 stitches of Color A.
Round 11: With Color A, Knit 1 stitch. *With Color B, knit 8 stitches. With Color A, knit 2 stitches.* Repeat ** till end of round, ending with 1 stitch of Color A.
Rounds 12 & 13: With Color A, knit 1 stitch. *With Color B, knit 9 stitches. With Color A, knit 1 stitch.* Repeat ** till end of round. Cut Color A leaving a six-inch tail.
Knit 5 rounds with Color B.
Repeat rounds 9-13 with Colors B & C.
Knit 6 rounds with Color C.
Decrease as follows:
Round 1: Knit two together, knit 6. Repeat for one round.
Round 2 (and all even rounds): Knit
Round 3: K2tog, K 5 for one round
Round 5: K2tog, K 4 for one round (this is where you should probably switch to the double points).
Round 7: K2tog, K 3
Round 9: K2tog, K 2
Round 11: K2tog, K 1
Round 12: K2tog
Cut yarn leaving a 12-inch tail. Gather remaining stitches with a darning needle and fasten off. Weave in all tails.
For the pom pom:
I recommend a pom pom maker, which you can buy for about $6 at any big-box crafts store. Another super technique I found on Pinterest, where you use a serving fork. It's pretty great if you're feeling lazy.
Secure your pom pom to the hat using yarn and a darning needle. Run the yarn through the pom pom a couple of times and tie on the inside of the hat. I always try and leave a little length in case the pom pom loosens so I can easily refasten it.

Thanks again to Muita Ihania for the pretty design.
Please contact me if there are any errors in the pattern. I've already given the hat away so I wasn't able to look at it as I was writing the pattern.
9/21/13
Simple Knitted Boot Cuffs
Don't know how much Game of Thrones you've been watching, but Winter is Coming.
That means scarves and coats and mittens and boots! Knitting season is officially on so why not start off with a super simple project to give your new fall outfits a little more refinement?

These boot cuffs can be made in just a couple of hours. Nothing fancy, but they are the perfect touch for those cute brown boots you've been waiting all summer to wear. You won't have to worry about bulky wool socks and hot feet when your boot cuffs are peeking out.
Here's what you need:
Bulky yarn -- less than one skein
Size 10, 16-inch circular needle
Darning needle

Cast on 48 stitches on your circular needle. Join the round, making sure not to twist the row.
K2, P2 around.
Repeat for 20 rounds.
Loosely cast off. Weave in ends.
Repeat for other cuff.
Wear as is or decorate with a cute button.
Easy as pie! Cute as cake?

5/11/13
Knitted Socks -- Finally!
I've been an avid knitter for about 11 years and during those years I have diagnosed myself with SSS -- Single Sock Syndrome. I will knit one sock, usually on size seven needles because I'm lazy, and then the idea of having to start a whole new sock is too daunting. The single sock rests forever in my random drawer of lost regular socks.
Until now.

My mother-in-law gave me Peruvian hand-dyed wool yarn for Christmas and I finally decided it was sock time. I was going to free myself from SSS.

I love how it knitted up. I used a simple pattern found on Ravelry called Beginner's Socks. The instructions were crystal clear, but having knitted countless Christmas stockings it was nothing new.
I used less than one skein of Araucanía yarn, 240 yards, 100 gram weight, color 411 with size six needles.

I decided I wanted short ankle socks with tighter ribbing, so I K1, P1 for only four rounds. I was going to take a progress photo and decided my toes were in dire need of a pedicure, so I got them all painted up to match the socks, but I finished them during my appointment. They knit up faster than I thought!
Until now.

My mother-in-law gave me Peruvian hand-dyed wool yarn for Christmas and I finally decided it was sock time. I was going to free myself from SSS.
I love how it knitted up. I used a simple pattern found on Ravelry called Beginner's Socks. The instructions were crystal clear, but having knitted countless Christmas stockings it was nothing new.
I used less than one skein of Araucanía yarn, 240 yards, 100 gram weight, color 411 with size six needles.
I decided I wanted short ankle socks with tighter ribbing, so I K1, P1 for only four rounds. I was going to take a progress photo and decided my toes were in dire need of a pedicure, so I got them all painted up to match the socks, but I finished them during my appointment. They knit up faster than I thought!
3/3/12
Jazz Baby Hat
My friend Blaze is about two weeks ahead of me in her pregnancy. She had a boy last year she named Lyric and she's getting ready to have a girl whom she is calling Jazz. Can you guess she's a singer?
With a name like Jazz I thought I should knit her a baby hat with some real flair. None of this pale pink stuff -- I've got to go purple and red!
And I've finally learned to crochet a flower. This was the original reason I taught myself to crochet and that was almost two years ago. I now have the skills to make one without referring to a pattern. I will try to write out how I made it.

Materials:
Worsted weight yarn (I used Vanna White yarn)
Size 8 double point needles (or a really long circular if you know the Magic Loop method)
Size H crochet hook (it could be smaller, but I only have two sizes)
Darning needle
Directions for hat:
Cast on 64 stitches. K1, p1 ribbing for 5 rounds
Knit in stockinette stitch for 25 more rounds, or till piece is about 4 inches tall.
Decrease as follows: *K2tog, k6*, repeat till end of round.
K 1 round
*K2tog, k5*, repeat till end of round.
K 1 round
*K2tog, k4*, repeat till end of round.
K 1 round
*K2tog, k3*, repeat till end of round.
K 1 round
*K2tog, k2*, repeat till end of round.
K 1 round
*K2tog, k1*, repeat till end of round.
*K2tog*, repeat till end of round.
Cut yarn leaving a 12-inch tail. Weave ends through remaining eight loops using a darning needle. Weave in end yarn.
Crochet flower:
I apologize for my poor pattern writing skills. I hope you are able to figure it out! Maybe tomorrow when I have daylight again I'll take step-by-step photos.
Abbreviations:
SC = single crochet
HDC = half double crochet
DC = double crochet
Round 1: Make a magic ring and SC 10 stitches into ring. Join with slip stitch to first SC.
Round 2: Chain 5, skip a stitch, slip into next stitch. Repeat four more times and join to first SC again. You should have five loopy things.
Round 3: SC once into first loopy area, then 2HDC, 1DC, 2HDC and 1 SC into same loopy area. Repeat with four remaining loops. Join to original SC.
Round 4: Skip one stitch from the first round and slip stitch into the stitches between the ones you single chained in round 2. Chain 8, skip stitch, slip into next stitch, chain 8, skip stitch, continue around till you have five new loopy things. Join with first slip stitch you made in this round.
Round 5: 2SC into first loopy, 2HDC, 3DC, 2HDC, 2SC into same loopy thing. Repeat with the remaining four loopy things. Cut yarn leaving a ten-inch tail and draw through the last loop. Weave in ends to back of flower.
Using a darning needle sew the flower in place.

1/7/12
Chunky Braided Winter Headband
Last year I posted a pattern for a braided winter headband. After making one for myself, my mom and my little sister I soon realized it was the most popular knitted item I've ever created. The problem is, I'm really lazy and unless I'm determined, I really hate making these headbands. It's simple, any beginner knitter could do it, but it takes too long and I lose interest.
I decided to try the pattern on larger needles with thicker yarn. Turns out I actually prefer the pattern this way. It goes by much more quickly and the texture stands out more strongly.
I'm still pretty lazy and can't get myself to produce enough to sell, but I thought I might as well post my pattern so I don't forget how I made it (hence the whole reason I started this blog in the first place).
If these instructions aren't clear enough, you can always look at my other pattern for a slightly different explanation.

Materials:
2 skeins of worsted weight yarn (you'll be knitting them together) OR one skein of bulky yarn
size 10 double point needles
darning needle
three attractive buttons
needle and thread
straight pins


Directions:
Using two double point needles, cast on 24 stitches. Knit in seed stich (also called moss stitch) till piece measures 12 inches. I always slip the first stitch of each row to keep the edge even.
*Next row: seed stitch the first 8 stitches onto an empty double pointed needle. Work back and forth on this "leg" for 12 inches.
Next row: k2tog, seed st. 3 stitches, k2tog
Next row: K2tog, k2tog
Bind off next row*
Repeat * for each of the two remaining "legs" of the headband.
Finishing:
Weave in the first tail of yarn.
Braid the three "legs" of the headband till there's about 2 inches left at the ends. Pin the three ends to the beginning of the piece, creating the headband shape. Make sure the ends overlap the beginning of the piece so there's a good amount of space for the size of your buttons.
Pin the braid in place. With the darning needle, secure each end in place using the tails from the "legs."
Turn headband inside out. With needle and thread, whipstitch parts of the braid so the "legs" are secure and don't move or twist apart when stretched.
Sew on your buttons.

11/24/11
Orange Sherbet Scarf
Last winter I got a tad obsessed with Pickles' pattern for a Simple Luxury Scarf. I made about three of them and then started on another but didn't get around to finishing it till this winter. It was the first one where I used totally different colors in the main yarn and the mohair. I used Cascade Yarn Cherub Aran and Cascade mohair.


Blue Starlight Sideways Scarf
I've been admiring a scarf we sell at work, the Zumi scarf by Prana.
I like how it's make the long way instead of the short way, how most scarves are made.
I figured it would be easy enough to make and it surely was. It was a great winter Sunday project.

Materials:
One ball of soft worsted weight single-ply yarn. I used Universal Yarn Classic Shades in the blue.
One ball of mohair in a similar color. I used some donated yarn that had silver glitter thread in it.
A really long size 13 circular needle
A size J crochet hook
Directions:
Loosely CO 150 stitches. Knit in garter stitch till work is 4-6.5 inches long, whichever you prefer. Loosely bind off.
For the tassels: Using the crochet hook, single chain four pieces of cord 12 inches long. Tie knots at the ends of each cord. Loop two to each end of the scarf.
Cheery Winter Set Patterns

These items were made with heavy worsted hand-dyed single-ply yarn.
The hat is a simple pattern. Seventy-two stitches on size 9 circular needles. K1, P1 rib for six or so rows and knit in st st for 7 inches. Decrease as follows:
Place marker. *K2tog, K 6*, repeat to end of round
Knit one round
*K2tog, K5*, repeat to end of round
Knit one round
*K2tog, K4*, knit to end of round
Knit one round
*K2tog, K3*, repeat to end of round
Knit one round
*K2tog, K2*, knit to end of round
Knit one round
*K2tog, K1*, knit to end of round
*K2tog*, repeat to end of round
Draw loops together and weave in ends. Add awesome pom-pom.

Click here for the ascot pattern

For the mittens I used the Magic Loop method of knitting. It really made the project go by fast. If you don't have any really long size 7 circular needles, then just use double points. For the cuff, use size 5, but don't forget to switch out. I had to undo half a mitten when I realized it was coming out smaller having forgotten to change to size 7.
CO 36 stitches on smaller needles. K1, P1 rib for 28 rows or until preferred length. M1 stitch four times evenly over the next row (40 st).
Change to bigger needles and other color if making bi-colored mitts. Knit 6 rounds even.
Thumb gusset:
Round 1: M1, K1, M1, knit to end of round
Round 2 and all even rounds: Knit
Round 3: M1, K3, M1, knit to end of round
Round 5: M1, K5, M1, knit to end of round
Round 7: M1, K7, M1, knit to end of round
Round 9: M1, K9, M1, knit to end of round
Round 11: M1, K11, M1, knit to end of round
Round 13: M1, K13, M1, knit to end of round
Knit 5 rounds
Thumb hole: Place the first 15 stitches onto a stitch holder or scrap piece of chunky yarn. CO one stitch and knit to end of round (40 st).
Knit in st st till the piece is 1/2 inch shorter than the top of your middle finger.
First decrease round: *K2, K2tog* repeat to end of round
K 2 rounds
Second decrease round: *K2tog, K1* repeat to end of round
K 1 round
Third decrease round: *K2tog*, repeat to end of round
Repeat the last round or you should have about 12 stitches.
Use the Kitchener stitch or just draw up the stitches and weave in ends.
For the thumb:
Place the 15 stitches onto two double points or on your long circular if doing magic loop.
Pick up and knit four stitches, knit to end of round.
On next round, decrease two stitches evenly.
Knit 4 rounds
Next round: K2tog, knit to end of round. You should have 16 stitches, but it's ok if you don't.
Knit in st st till it's as long as your thumb.
Decrease round: *K2tog* till end of round. Draw up yarn and weave in all ends.
Now make one more so you have two mittens to warm both hands!
To make a lining:
Trace the outline of the mitten to a pice of flannel doubled over. Add two inches to the tracing and cut out. Sew double seams all around the flannel mitten. You must make sure you can easily put on the flannel mitten, especially in the wrist area. I had to try a couple of times to get a good fit. Make two and hand sew into the mitten inside-out because that way the raw seams will not be on the inside of the lining.

New Mittens
Last May I went to New York City and finally got to use the gift certificate my little sister got me for Christmas at Purl Soho, the cheeriest yarn shop ever. Since then I've been dying to use some of the yarn I bought there, so I finally decided to make some new mittens. These are made out of Manos de Uruguay yarn. I don't know what brand the red is anymore, but the pink is actually called "cheek."
I used my basic mitten pattern, but instead of drawing up the top of the mitten like I do a hat, I used the Kitchener stitch to make it seamless.
Then I added a crocheted ruffle trim, which was a first for me. Another first was I lined these mittens with red flannel. I'm glad it was fabric I acquired from a thrift store, because it took me several tries to make a lining that fit properly.
So now I have some delightful mittens to match my hat and ascot, which I will post photos of later.
Happy Thanksgiving and I'll write from Mexico!
-Nat

11/5/11
Magic Loop
Dear Fellow Knitters,
If ever you find yourself knitting mittens, socks or booties, I highly recommend using the Magic Loop Method.

It eliminates unwieldy double pointed needles, knitting becomes quicker and you don't have any pesky "ladders" as a result of improper tension between needles.
It takes some finesse to figure it out at first, but once you understand how to Magic Loop knit, it goes by quickly.
Here is a great video tutorial:
Now I've got to finish my second mitten. I already finished the first one I started this morning. Can't wait to show y'all!
-Nat
10/6/11
The Tiniest Steelers Fan!
My friend Laura had her son five weeks early. A few days after he was born she asked me if I would make him a Steelers hat (even though I know she's a Colts fan, but I guess he's daddy's boy in the sports department).
I made the little guy the littlest hat. I couldn't imagine this hat fitting a person, but it looks like it fits him just fine and with lots of room to grow.

I made the hat using the magic loop method because it was so small that I would have had to use double points from the get-go. A normal circular needle would have been too long. Magic loop uses an extra long circular needle and you work half the stitches at a time while the other half rests on the bendy part of the circular. This sounds confusing, but once you get the hang of it it can be much faster than using double points. Just remember, every knitting technique I know I've had to learn backwards since I'm left handed, so if I can do it, you can do it!

Preemie Steelers Hat
Materials:
Worsted baby yarn in yellow, black and white
At least a 32-inch long size 8 circular needle or one set of size 8 double points
Tapestry needle

Directions:
Cast on 56 stitches of the white yarn either using the magic loop method or divided onto three double pointed needles.
Join your work, making sure the yarn isn't twisted. Place a marker if needed.
k1, p1 rib for five rounds.
Knit eight rounds in stockinette stitch. Switch to black. Knit three rounds. Switch to yellow. Knit four rounds. Switch to black and knit three rounds. Switch back to white and knit eight rounds.
Decrease as follows:
At stitch marker, *k2tog, k6* Repeat * till end of round
K one round
*K2tog, k5*, repeat * till end of round
K one round
*K2tog, k4*, repeat * till end of round
K one round
*K2tog, k 3*, repeat * till end of round
K one round
*K2tog, k 2*, repeat * till end of round
K one round
*K2tog, k1*, repeat * till end of round
*K2tog*, repeat * till end of round.
Cut yarn leaving an 8-inch tail. Using a darning needle, weave in all ends.
For pom-pom:
Using something small, like a matchbook, wrap yarn around and around a ton of times. Remove the matchbook and tie a 12-inch piece of yarn around the middle of the yarn loops. Cut the loops. Trim pom pom to preferred size.

10/4/11
Shake Your Booties!
"All the hotties at the party feeling naughty shake your boobies, yeah
Who likes to rock the party? Who likes to rock the party?
All the ladies with their babies make their babies shake their booties, yeah"
Ok, that's always what I think of when I think about knitting booties. If you don't know what I'm talking about, Google it. It's funny.
I've never been a big fan of bootie making. I guess it's cause they are tiny and you have to make two of them and I really dislike knitting things flat and then stitching them up at the end. I am a knit-in-the-round type of gal.
After downloading the Red Heart Yarn app the other day, I did some bootie searching and found a pattern I actually liked. I went so far as to use the exact yarn in the pattern. They turned out just like the pattern picture!

Don't tell my husband, but I stole spare buttons off one of his dress shirts. It was a really quick knit. I made one during an episode of Law and Order, so it must have taken two hours to make both. The pattern is free and can be accessed Here. Now I need to give them to a baby so I can see them in action.
6/28/11
Girdwood Forest Fair Preview
I found out a week ago that a friend and I are sharing a booth at the Girdwood Forest Fair, an annual festival dedicated to homegrown food, crafts and music. I've been attending the Forest Fair since I was able to bum rides from older friends -- so....15 years?
I've been busy as the busiest bee and/or beaver in the last few days trying to get my crafts together. Here's a small preview of some of my wares. Come down to the Forest Fair July 1, 2, and 3 and I'll give you a special Knit Nat discount on any of my crafts!


I've been busy as the busiest bee and/or beaver in the last few days trying to get my crafts together. Here's a small preview of some of my wares. Come down to the Forest Fair July 1, 2, and 3 and I'll give you a special Knit Nat discount on any of my crafts!


 |
| Headbands Galore! |
 |
Subscribe to:
Comments (Atom)